October 28, 2015

Hello birds!

Hello dear friends!
Today I'm sharing a fun and cute canvas for 2Crafty Chipboard blog, 
with  lots of colors and ...birds :)


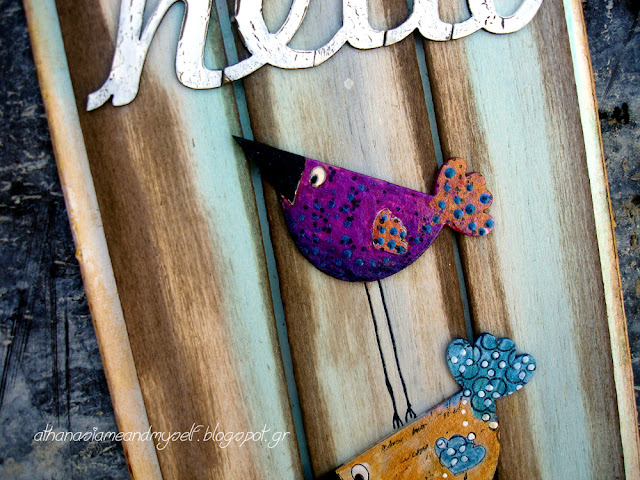
I had this beautiful set of birds for some time and just waited for the great idea to come and use them.
The set contains three sizes of birds (two of each size), so I came up with a bird pyramid.


I decided to use 4 of the 6 birds, not only for the reason to keep my pyramid not too high, but also to use the particular white cardboard I had. I measured a balsa wood at the same size of the cardboard, cut it in 3 and glued it down.  I painted both of them with gesso, blue silks and brown distress stain. 
Ι didn't use any stamps or stencils, as I wanted to keep the background quite and simple and focus on the birds.

To alter the birds I used silks, a little bit of gesso, stamps and a black permanent pen...

First I painted them with just a small amount of gesso very carefully, because I didn't want to cover the beautiful engraved pattern of them. Τhe white gesso helps the colors to show bright and right. 
After the gesso dried, I painted them with the silks.  Then I stamped on them here and there and paint some details with a pretty thin paintbrush again with silks. Last thing to do was to draw the legs with the black permanent pen.

For the tittle I used the Script Font L/C alphas. I really like this script because of the calligraphy type - the letters abutting each other so nicely like they are handwritten.
I altered them with white crackle paint and I love how they turned out!

2Crafty Chipboard products used on this project:

Beaky Birds 

Script Font L/C 

BeakyBirds (unit of 3)  Script Font L/C (units of 3)


Thank you for visiting!
Have a lovely crafty day!


October 25, 2015

love yourself - art journal page

Hello! Today I'm sharing an art journal page for ColourArte blog. 

This month all the designers of ColourArte have been asked to work with the Think Pink Twinkling H20s set in honor of Breast Cancer Awareness. For this project I used:
ClolourArte products:
Other Supplies:
  • Finnadair circle stencil
  • Finnabair Light Paste
  • Finnabair star brads
  • Finnabair background stamps
  • 7 Dots stichers and tag
  • Prima flower
  • thread
  • rice paper
 Let's get started!
First I sprayed with water the three pink shades of the  Think Pink Twinkling H20s to activate them. Then I used the circle stencil with the light paste.
DSC08288
When it was dry, I painted the small circles with the three colors randomly. These colors are so shiny and bright like a lip-gloss - I love them!DSC08293
DSC08296

I let it to dry...
Then I made a small heart to use it as an embellishment in the composition.DSC08245
I stamped the image with VersaMark (it's a glue ink pad) on rice paper and spread some PE Black Ice. I removed the excess with a paintbrush. The powder sticks on there and reveals the image of the stamp.DSC08249
Then I spread some PE Red Pearl to make it more shiny and removed the excess with the paintbrush.DSC08252
I cut the image with scissors.DSC08257
Here is my heart ready to use on the project.DSC08306
After I glued everything down, I made some splashes with China Black silk. 

***buy a journal like this at The Journal Shop

That was all for today.
If you are interested to do something nice about Breast Cancer Awareness, this important issue, you can send donations to National Breast Cancer Foundation - they provide health Services to women in need!!!
national-cancer-foundation

For more inspiration you can see my first project I created for Breast Cancer Awareness here.

Have a lovely crafty day!


October 23, 2015

Today is the Day

Hello dear friends!
Are you ready for new adventure ? 
New Creative Gym is up at Mixed Media Place, hosted by me:

"Today is the Day'


This quote is one of my favorites because, even it is simple and short, it shows splendidness like something very important is about to happen and you can complete this quote however you like as well!
I decided to use the photo of the moodboard on my canvas and write with my permanent pen my version for the end of the quote. 
I also got inspired by the colors, shine and glory of the moodboard...

For this project I used a white cardstock, coated with white gesso as a base. To create the background I used a circles stencil by Finnabair with 3D Gloss Gel and gold Mica Powder and Finnabair background stamps with black ink.

After it was all dried, I glued the embellishments: some 2 Crafty Chipboard pieces, a flower, gold thread and Finnabair mechanicals. I glued all these with 3D Gloss Gel.

The next step was to spread some Rust Mica Powder here and there and spray it with water. I dried it with the heat gun and then I glued the paper embellishments: two butterflies (made with rice paper, stamp and black embossing powder) and the photo.

As a final touch I spread several art ingredients with 3D Gloss Gel. I really love the sparkle and texture they create on the project!

***all products by Mixed Media Place store
***chipboard pieces by 2 Crafty
***you can buy this canvas here

>>>

With this project I'm entering the challenge at Paper Maraca 'Gold'...


>>>

I'm looking forward to see your projects for our challenge at Mixed Media Place!
Have a lovely crafty day!

October 19, 2015

Create Altered Art - Finn Team

Hello dear friends! 
Today I'm sharing my first post on Finnabair Creative Team and I'm very excited to be working with such amazing and talented ladies!
For my first post I decided to alter an old paintbrush. I found this beauty in a basement and it was love at first sight. :)
Here's how an old, dusty and long forgotten paintbrush turned out when I attacked it with Finnabair's Art Basicsand Art Ingredients.

The front:

And the back:


I wanted to make both sides of the paint brush look interesting, so I used two Plated Labels from the Mechanical set 'ART' and 'CREATE' with some mini brads.
I really love that they look as if they were screwed on the brush - in fact, they aren't, I just glued them with 3D Gloss Gel.
I also used a few more Mechanicals to embellish the brush, again with the 3D Gloss Gel.


In order to change the color of the brush, I made a custom paint with Soft Matte Gel and Rust Mica Powder. This combination makes a waterproof paint which will stay on your surface no matter what - I just love it!
I also made two more custom paints with Soft Matte Gel and Mica Powders: 'Peach Opal Magic' and 'Blue Opal Magic'. These opal powders are really magical. They have beautiful sparkle and shine, which will be perfect to add unique luminous look to any craft project. I love how they look on my paintbrush!


I also used two Art Extravagance line Texture Pastes 'Platinum Crackle' and 'Graphite' on several spots.

I like textures on my projects and these two are so different each other. The effect they create is so unique.


After all media were dry, I added on desired spots five different Art Ingredients to give more texture and create beautiful look: copper micro beads, pitch black glass glitter, copper glass glitter, gold glass glitter and mulberry mica flakes.


I used quite a lot of Finnabair Art Basics and Ingredients and had so much fun playing with all these media.
Here is my video so you can see the whole process step by step...


*** products list here

I hope you find my first Finn Team project inspiring!
Maybe you also have some old paintbrushes that are just waiting there to get a new altered life? ;)

xxx

Athanasia


October 13, 2015

Don't be scared to be alone

Hello mixed media friends! 
Today I'm sharing a page on my black journal Ι created for Mixed Media Place. 
The purpose of this journal-book is to keep all the inspiring quotes I find on internet. I always try to make flat pages because I want to keep it thin, as it has quite a lot pages to fill in... 

This time I used silks, primary elements, 3D Gloss Gel, two stencils, two knitted flowers, a photo and black permanent pen with white paper to write the quote: 
Don't be scared to be alone. Don't be scared to like it. 
People say that artist are lonely creatures who love being alone with their thoughts and making art. Well, I think some times we all need to be alone for a while, even just to hang out with ourselves, at least that is something I love to do very often.

I found this photo on Pinterest. While printing my photo, I didn't notice that the black ink of the printer was finished. I was very disappointed  when I saw the printed photo looking not right.  Nonetheless, after a while I had some second thoughts about it... The photo didn't look bad anymore, instead it looked to me very very interested, so I decided to use it as it was :)


To create the background, first I made a custom paste with the 3D Gloss Gel Finnabair Art Basics and the Sunflower silk and used it with the rhombus stencil.  When it was dry, I used the script stencil with the Guatemala Green silk and let it dry. After that, I used the Iridescent Green and Gold silks with the old credit card. I think that iridescent paints are the best choice for dark background. They shine beautifully and create a unique effect on your projects! When the paints were all dry, I glued the photo and the white pieces of paper with the handwritten quote.

Last thing to do was to glue two small knitted flowers to give a little bit of dimension to the composition. I spread some Black Emerald primary element on them and also on some desired spots of the page. I sprayed them with water and just let the magic happen :)

(In the photo above you can see my little friend keeping company to me while I was taking the photos lol - I always take my photos outside because of the better light)


***all products by Mixed Media Place store

>>>

With this page I'm playing at Fashionable Hobbies challenge 'My favorite Material'
Iridescent silks are my favorite ever product to use when I'm working on my black journal. They shine so beautifully and I think they are the best choice for dark background!

>>>

I hope you got some ideas today on how to use colors on dark surface.
Till next time,
Have a lovely crafty day!


October 11, 2015

Sweet Memories

Hello everyone!
Today I'm hosting the 2Crafty Chipboard blog,
with a pretty small project.


This small project is made on a white cardboard and has many uses:
you can use it as a tiny canvas, frame it, or give it to friend as a card. I used quite a few material to create it and I love it because it's so small :)


For the background I used the Circular Panel 6x6 as a stencil with Dimensional paint.
It's really a great use of that kind chipboard because it's thicker than a regular stencil and you get a very impressive result!
I also used a leaf from the Leafy Silhouettes set and an arrow from the Mini Fast Forward Arrows set to embellish the project.
To make the photo more interesting I made some doodling on the grass, the apples and the boy, with my permanent black pen. I really love the result! 

2Crafty Chipboard products used on this project:

Circular Panel

Mini Fast Forward Arrows

Leafy Silhouettes


Circular Panel (units of 3) Leafy Silhouettes (unit of 3)
 Mini Fast Forward Arrows (unit of 3)


>>>
With this project I'm entering the Skrapogoliki challenge 'Apple Time'
I used a photo with a valley full of apples. 

...the Kiev Skrapklub task #102 sketch
(I turned it horizontal)

...and the Kiev Skrapklub Autumn Inspiration challenge 
with all these beautiful Fall colors.

>>>

Thank you for visiting!
Have a lovely crafty day!