Showing posts with label Christmas. Show all posts

December 24, 2015

Christmas wishes from Finnabair CT

Merry Christmas everyone!
Τhe whole Finnabair Creative Team created their personal artistic Christmas wishes for all of you...
My wish to all of you is LOVE!


You can visit Finnabair's blog to see all the amazing projects team created.
We hope all these wishes will come true for you. Enjoy and feel inspired! 

Here are some details of my project. It's full of Finnabair products: White Heavy Gesso, 3D Gloss Gel, Glass beads, glitter, 'love' button, a piece of resist canvas with which I made a pocket on the bear's belly, star brads. 
The word LOVE is by 2Crafty Chipboard.


Sending warmest hugs for the Christmas Time!

xxx
Athanasia

December 20, 2015

Altered star for Christmas

Happy Sunday everyone!
Today I'm sharing an altered fabric star I created for ColourArte.

For this project I used:

ColourArte products:
Other products:
  • Finnabair products: White Heavy Gesso, 3D Gloss Gel, Ephemera vintage photo, glitter, Glass Beads, Pearls and Glitter, Metal embellishments
  • 2Crafty chipboard star
  • 7 Dots Studio sentence sticker
  • lace
  • buttons
  • shinny black grass
  • wire


First I attached the wire on two sides of the star to create a hanger. I also hanged a cute tassel at the underside of the star. How cute is that?! I removed a couple of beads of the tassel and attached on the wire.
Then I applied white gesso with a sponge all over the star.

Next thing to do was to alter the chipboard star.
I painted it with the warm gray and pale porcelain H2Os and spread some glitter on it.
I really love these two shades, I think they are perfect for vintage projects!
I let it dry.

Then I cut with scissors the little girl from a Finnabair's Ephemera vintage photo and glued it on the chipboard star. I glued all the embellishments on the fabric star with 3D Gloss Gel and spread glitter and Glass Beads here and there.


As some final touches I used with a paintbrush the  Blue Ice H2O here and there.
Despite the red shades of the project, I decided to use blue color because I always like to add a little bit of blue on vintage projects.


>>>

With this project I'm playing at:

7 Dots Studio 'Cold Weather' challenge.
Despite the red shades of this project, I believe it creates a cold vintage feeling.
I used stickers from Yuletide collection.


Art Sandbox challenge 'hanging on a Christmas tree'
 

>>>

So, that was my altered vintage inspiration for today.
I hope you got some ideas :)

Have a lovely crafty day!

xxx
Athanasia


December 15, 2015

NOEL

Hello mixed media friends! 
Today I'm hosting the Mixed Media Place with a Christmas project.

I found this beautiful card in Finnabair's Ephemera. I thought that the theme with the angels was so cute to make something for Christmas. I decided to make a simple cluster under the angels and not cover them with any paint. I glued the card on a white cardboard, and distressed the edges with the Vintage Photo distress ink.


For the cluster I glued with 3D Gloss Gel a Mechanical Flower at the bottom, then a flower lace, then a 2 Crafty chipboard star and last on the top a Mechanical Bottle Cup. I also used a star brad to secure the bottle cup on the star.

I used White Heavy Gesso, 3D Gloss Gel, Mica Powders (green and opal magic blue) and several Art Ingredients like Micro Beads, Flakes and Glitter to paint and alter all these elements.
At the underside of the star I hanged a cute tassel with a tiny bell that actually sounds when it's moving! How cute is that?!
I really love how it's hanging under the composition :)

In order to make a hanger I used wire. I made a couple of holes with cropadile, twisted the wire around the holes and secured it with a tiny star brad. I also tied a ribbon on the wire to decorate it.

For the tittle I used a sticker with the word 'NOEL' from the  7Dots Studio Yuletide collection.
***see full supplies list here

...

With this project I'm playing at Art Sandbox challenge 'hanging on a Christmas tree' 

...

I hope you got some ideas on how to decorate a single ephemera card :)
Have a lovely crafty day!


December 6, 2015

Altered Snowman *with video

Hello dear friends! Today I’m sharing a Christmas project for ColourArteAn altered small vase which turned out into a snowman. I made a video with all the process, I hope you will enjoy it.
First let’s see what ColourArte products I used for this project:
Other products:
  • small IKEA vase
  • handmade felt hat
  • Finnabair Black Jesso
  • Finnabair Soft Matte Gel
  • Finnabair Snowflake Paste
  • Finnabair Art Ingredients (White Art Sugar, Pearl Glass Glitter)
  • Black permanent pen
  • Christmas decorations (bell, sparkle grass, snowflake sticker, 7Gypsies brad and candycane sticker)
  • Red ribbon
  • twine
  • Finnabair Mechanicals – label
I made custom waterproof paints with Soft Matte Gel and Primary Elements and painted the vase and the hat. I also used the H2Os to color the snowman’s nose and cheeks.
Here are some details…


…and the video with the process…


I had so much fun creating this cute project! 
love making Christmas decorations for my house :)

.....
For more inspiration you can see my other altered project here

.....

Thank you for visiting!
Have a lovely crafty day!

December 1, 2015

'Peace on Earth' ATCs

Καλό μήνα! Tα Χριστούγεννα πλησιάζουν και έχω αρχίσει να μπαίνω σιγά σιγά σε εορταστικό mood, χιχι... Σήμερα σας έχω δύο ATC με αγγελάκια για το Scraps N Pieces.

Ηappy December everyone!
Christmas is getting close and Ι'm already in Xmas mood :)
I created two ATCs for Scraps N Pieces.
 To moodboard μας αυτόν τον μήνα είναι Χρισουγεννιάτικο, με γήινα χρώματα και ...γλυκό :)
Μπορείτε να εμπνευστήτε από οτιδήποτε θέλετε (χρώματα, γλυκά, αστέρια, ΑγιοΒασιλάκια, κτλ) και η δημιουργία σας δεν χρειάζεται  να είναι Χριστουγεννιάτικη.

For your inspiration we have a Christmas moodbard, with earth colors and lots of sweets :)
You can create any kind of project, as long as you tell us what inspired you by this moodboard (colors, sweets, cookies, stars, Santa, etc). Your project doesn't have to be Christmas themed. 


Για όσες δεν έχετε δει ή ακούσει για τα ΑΤC (artist trading cards), να σας πω ότι είναι μικρές καρτούλες, πολύ μικρές όμως, 2,5x3,5 inches (δηλαδή 6,35x8,89 cm - να σας γλυτώσω από το googleάρισμα) :)
Χρησιμοποίησα λοιπόν 2 σε αυτές τις διαστάσεις σε craft χρώμα. Για το background κόλλησα χριστουγεννιάτική χαρτοπετσέτα με γκι με κόλλα decoupage και χρησιμοποίησα Finnabair stencil, σφραγίδες (αυτή και αυτή), Mica Powders, Soft Matte Gel, Micro Beads, Flakes και glitter.  

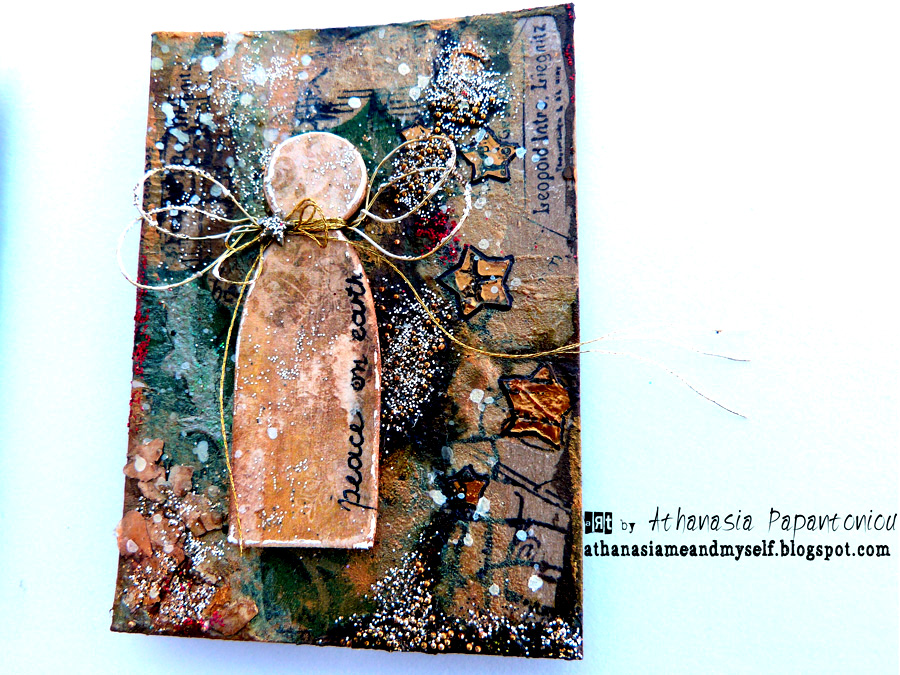
ATC (artist trading cards) are small cards, measured only 2,5x3,5 inches.
For the background I decoupaged a Christmas napkin with mistletoe and used Finnabair products like stencil, stamps,  Mica Powders, Soft Matte Gel, Micro Beads, Mica Flakes and glitter.


Για να φτιάξω τα αγγελάκια σχεδίασα ένα απλό σκίτσο σε χαρτόνι, το έκοψα με ψαλίδι, το κόλλησα πάνω σε scrapbooking χαρτί και το ξαναέκοψα. Επίσης τα ψιλοέγδαρα λίγο με το ψαλίδι για να φαίνονται vintage. Για τα φτερά χρησιμοποίησα χρυσό σύρμα και για το στόλισμα χρυσή κλωστή με ένα Finnabair αστεράκι brad.

For the angels I made a simple draw on card board, cut it with scissors, glued it on a pattered paper and cut it again with scissors. I distressed the angels with my scissors to make them look like vintage. I used gold wire to make the wings and gold thread with a Finnabair star brad to decorate it.

Tέλος έγραψα τον τίτλο με ανεξίτηλο μαύρο μαρκαδοράκι πάνω στα αγγελάκια, έκανα μερικές γραμμές με λευκό Uniball Signo και πιστιλιές με άσπρο gesso.
H όλη διαδικασία έγινε ταυτόχτονα και στις δύο κάρτες.

I wrote the title on the angels with a permanent pen, made some doodling with white pen Uni-ball and some splashes with white gesso.
The hole process was carried simultaneously on both cards.
***Μπορείτε να βρείτε όλα τα υλικά που χρησιμοποίησα στο μαγαζί του Scraps N Pieces εδώ.
***you can buy all supplies I used for this project at the Scraps N Pieces Emporium 

Η νικήτρια θα επιστρέψει ως Guest Designer και μια τυχερή θα κερδίσει μια υπέροχη συλλογή χαρτιών της Dovecraft!
...

Κορίτσια περιμένω να δω τις δημιουργίες σας!
Φιλιά!

So, will you play with us at Scraps N Pieces for a chance to win this beautiful paper collection by Dovecraft (see the picture above)!?
I can't wait to see your projects!

xxx
Athanasia

November 28, 2015

'JOY' altered tiny jars

Hello :)
Today we have a super fun reveal Spread Your Wings Academy
with Finnabair CT!

Every time I want to create any type of project, the first thing to do is to choose the right Art Basics for my project. And every time I do that, I find the Soft Matte Gel on my table waiting for me to play with Mica powders. I love making custom waterproof paints, because they don't react with water and give me full control when I'm adding different layers of media. I think they are the perfect base to work with in mixed media projects, like these tiny cute jars.


These jars are so tiny that the chipboard letters look like giants on them!
I made two custom paints with Soft Matte Gel and two shades of Mica Powders (Blue Opal Magic and Pale Silver) and painted the jars inside and outside. This paint works perfectly as a glue too, so I placed the Roman Numerals directly on the paint and let it dry.

Then I added some White Gesso and Platinum Crackle Paste here and there. I spread some Silver Micro Beads and let it dry. 


While I was waiting the media to dry, I altered the 2Crafty Chipboard letters and snowflakes. I used the two shades of custom paints to paint them and spread some glitter on them. This paint drys very fast, so the chipboard where pretty quickly ready to use on my project. I twisted some silver wire around them and attached the letters on the jars. Then I tied small bows with silver thread and glued the snowflakes on them.

I also altered three Pendant Cups with the Blue Opal Magic custom paint. I painted them first with Black Gesso and then painted the opal color. It really looks awesome on black surface! I spread some Silver Micro Beads and Pearl Glass Glitter and let it dry. Then I attached some fancy holiday grass I had in my stash and secured it with a brad. The cups have a little hole in the middle and the brads fit perfect in there! The cups themselves also match perfect on the holes of the jars!

Last thing to do was to paint the jars and the letters with Snowflake Paste and spread some Frosted Mica Flakes and Glitter on the paste.

***see full supplies list here

Thank you for visiting!
Have a lovely crafty day!

xxx
Athanasia

November 20, 2015

Xmas ATCs


Hello, hello!
Today I'm sharing my first Christmas project for this year
for Mixed Media Place Creative Gym!


This month challenge is host by our amazing and talented Tusia! 
Create a Xmas card, tag or ATC (only small forms are allowed).

I wanted to make some Christmas ATCs  for 6 special scrappy friends of mine and this challenge was the great opportunity to make the decision and get started working! 

I had these craft chipboards in my stash for a long time waiting for the right moment to transform into art pieces. They are only 2,5x3,5" and that was a challenge for me to work with so small areas.
I used papers, tags and stickers from the 7 Dots Studio Yuletide collection, a Christmas collection perfect for seasonal projects.

I placed all six of them on my craft desk and started working. First I used gold and red embossing powder with stamps to create a beautiful base to work on it.

Then I glued all the embellishments and worked with H2Os watercolors and a paintbrush on several spots.  I also painted the chipboard pieces and the flowers with them.

 Last thing to do was to make a shiny glue with 3D Gloss Gel and gold glitter. 3D Gloss Gel dries clear, so I wanted a little bit of sparkle to be shown on the finished project, that's why I added the gold glitter. I used it to glue some Art Ingredients like gold Glass Glitter and ruby Glass Beads, pretty Christmas colors, don't you think? :)
***you can find supplies list here
(Just scroll down to find my project)
So, will you play with us at Mixed Media Place?
I can't wait to see your small form projects!


Thank you for visiting,

have a lovely crafty day!


xxx

Athanasia