Showing posts with label Mixed Media Place DT. Show all posts

February 12, 2016

ATCs - Collect moments

Hello dear friends! 
Today I'm hosting the Mixed Media Place!


I created these ATCs one for a friend and one for my personal collection. They are actually twins! If you look carefully you will find out that the one on the right is the upside down side of the left one... or the opposite :)

In order to create the background I placed the mini cards one next to each other and worked at the same time on both of them. First I used a circles stamp with Butter Embossing Powder and then the Scissors Stencil with the Graphite Texture Paste to create even more texture.

When the texture paste was dry I used three different shades of silks to paint the cards all over their surface. Silks are very shiny paints, you can see it on how all the pictures glow! The embossing powder resists the silks, but the Graphite sucks it! Ι love how the scissors turned out, with this double shaded color!

Next step was to glue everything down. As ATCs are very small cards, I used only a few embellishments, like small scraps and labels from the 7Dots Studio Soulmates Collection, 2Crafty Chipboard arrows (I painted black with Winter Ice silk), a couple of eyelets, bubble stickers and thread.

Then, I used the Soft Gloss Gel to glue some Glitter and Micro Beads on the big circles. It drys clear and I love the effect!!!

 Last thing to do was to paint here and there with three shades of H2Os Watercolors and also make some splashes with them. And that was all!
***you can find full supplies list here
I hope you got some inspiration on how to give shiny effect on your projects!
Have a lovely crafty day!
xxx
Athanasia

January 25, 2016

Grow like a weed

 Hello Mixed Media friends!
Today I'm hosting the Mixed Media Place blog with a journal page!

 I love making pages with quotes or thoughts in my journal. I found this beautiful sentence in the 7 Dots Studio 'Nature Walk' collection GROW LIKE A WEED and that was my inspiration for this page.
I made a collage with scraps from a paper of the same collection and sealed them with Clear Gesso. Then I used some green and blue shades sprays to paint the background with a paintbrush. 

When it was dry  I decided to make a couple of circles using the cup of a Mica Powder as a template and a black permanent pen. I also made a smaller one and painted them all with blue shades of gelatos. I let it dry and then I used some stamps to create more interest on the background. I also used the Heavy White Gesso and a stencil here and there for more texture.

In order to alter the chipboard flower I used Heavy White Gesso to paint it and Lindy's Stamp Gang white spray to make it more shiny. When it was dry I spread some Black Glass Glitter on some spots and glued it with 3D Gloss Gel. I really like how it turned out! 

Then, I glued down the flower with 3D Gloss Gel and spread some Mica Powder (Bottle Green and Frozen Lake) here and there with a dry brush. I sprayed some water on these spots and let the magic spread all over the composition! After that, I used again the 3D Gloss Gel to glue some fabric and the sticker with the sentence. 

 My final touches are always some splashes with White and Black Gesso.
***buy all products used for these project at Mixed Media Place online store
***buy a journal like this at  The Journal Shop

>>>

With this page I'm entering -again :) - the Berry71Blue challenge
 with this amazing color pallet.


>>>

Have a lovely crafty day!
xxx

December 15, 2015

NOEL

Hello mixed media friends! 
Today I'm hosting the Mixed Media Place with a Christmas project.

I found this beautiful card in Finnabair's Ephemera. I thought that the theme with the angels was so cute to make something for Christmas. I decided to make a simple cluster under the angels and not cover them with any paint. I glued the card on a white cardboard, and distressed the edges with the Vintage Photo distress ink.


For the cluster I glued with 3D Gloss Gel a Mechanical Flower at the bottom, then a flower lace, then a 2 Crafty chipboard star and last on the top a Mechanical Bottle Cup. I also used a star brad to secure the bottle cup on the star.

I used White Heavy Gesso, 3D Gloss Gel, Mica Powders (green and opal magic blue) and several Art Ingredients like Micro Beads, Flakes and Glitter to paint and alter all these elements.
At the underside of the star I hanged a cute tassel with a tiny bell that actually sounds when it's moving! How cute is that?!
I really love how it's hanging under the composition :)

In order to make a hanger I used wire. I made a couple of holes with cropadile, twisted the wire around the holes and secured it with a tiny star brad. I also tied a ribbon on the wire to decorate it.

For the tittle I used a sticker with the word 'NOEL' from the  7Dots Studio Yuletide collection.
***see full supplies list here

...

With this project I'm playing at Art Sandbox challenge 'hanging on a Christmas tree' 

...

I hope you got some ideas on how to decorate a single ephemera card :)
Have a lovely crafty day!


November 20, 2015

Xmas ATCs


Hello, hello!
Today I'm sharing my first Christmas project for this year
for Mixed Media Place Creative Gym!


This month challenge is host by our amazing and talented Tusia! 
Create a Xmas card, tag or ATC (only small forms are allowed).

I wanted to make some Christmas ATCs  for 6 special scrappy friends of mine and this challenge was the great opportunity to make the decision and get started working! 

I had these craft chipboards in my stash for a long time waiting for the right moment to transform into art pieces. They are only 2,5x3,5" and that was a challenge for me to work with so small areas.
I used papers, tags and stickers from the 7 Dots Studio Yuletide collection, a Christmas collection perfect for seasonal projects.

I placed all six of them on my craft desk and started working. First I used gold and red embossing powder with stamps to create a beautiful base to work on it.

Then I glued all the embellishments and worked with H2Os watercolors and a paintbrush on several spots.  I also painted the chipboard pieces and the flowers with them.

 Last thing to do was to make a shiny glue with 3D Gloss Gel and gold glitter. 3D Gloss Gel dries clear, so I wanted a little bit of sparkle to be shown on the finished project, that's why I added the gold glitter. I used it to glue some Art Ingredients like gold Glass Glitter and ruby Glass Beads, pretty Christmas colors, don't you think? :)
***you can find supplies list here
(Just scroll down to find my project)
So, will you play with us at Mixed Media Place?
I can't wait to see your small form projects!


Thank you for visiting,

have a lovely crafty day!


xxx

Athanasia 


November 14, 2015

Brokenness

Hello mixed media friends!
Today I'm hosting the Mixed Media Place blog!


I found this beautiful and interesting photo on pinterest and my mind went straight to my black journal. I used a lot of media to create a dark and mysterious background, a couple of 2Crafty Chipboard frames to embellish it and alpha stickers to write the title:
'She always had a way with her brokenness'.
 In order to create a mixed media background, I used from Finnabair Basics Heavy White Gesso, Modeling Paste and Matte Soft Gel. First I used a doily stamp with black embossing powder. I melted the embossing powder and glued some paper stripes here and there. Then I used the Modeling Paste with a stencil and a beautiful background stamp with black ink.

Then, I glued the chipboard frames and painted them with Black Silks. I also used the Iridescent Copper Silks on some spots.

Next thing to do was to write the title. I used alpha stickers from the 7Dots Studio Domestic Goddess collection. I sealed them with Soft Matte Gel and made some doodling with the Uniball White Pen.


As some final touches I glued some Mulberry Flakes (I absolutely love this color!!!) with the Soft Matte Gel and made some splashes with the White Gesso.

***You can find a full list of supplies HERE
and buy all supplies at Mixed Media Place store

I hope you got some ideas on how to create a dark and mystery background!
Till next time,
have a lovely crafty day!

xxx
Athanasia


October 23, 2015

Today is the Day

Hello dear friends!
Are you ready for new adventure ? 
New Creative Gym is up at Mixed Media Place, hosted by me:

"Today is the Day'


This quote is one of my favorites because, even it is simple and short, it shows splendidness like something very important is about to happen and you can complete this quote however you like as well!
I decided to use the photo of the moodboard on my canvas and write with my permanent pen my version for the end of the quote. 
I also got inspired by the colors, shine and glory of the moodboard...

For this project I used a white cardstock, coated with white gesso as a base. To create the background I used a circles stencil by Finnabair with 3D Gloss Gel and gold Mica Powder and Finnabair background stamps with black ink.

After it was all dried, I glued the embellishments: some 2 Crafty Chipboard pieces, a flower, gold thread and Finnabair mechanicals. I glued all these with 3D Gloss Gel.

The next step was to spread some Rust Mica Powder here and there and spray it with water. I dried it with the heat gun and then I glued the paper embellishments: two butterflies (made with rice paper, stamp and black embossing powder) and the photo.

As a final touch I spread several art ingredients with 3D Gloss Gel. I really love the sparkle and texture they create on the project!

***all products by Mixed Media Place store
***chipboard pieces by 2 Crafty
***you can buy this canvas here

>>>

With this project I'm entering the challenge at Paper Maraca 'Gold'...


>>>

I'm looking forward to see your projects for our challenge at Mixed Media Place!
Have a lovely crafty day!

October 13, 2015

Don't be scared to be alone

Hello mixed media friends! 
Today I'm sharing a page on my black journal Ι created for Mixed Media Place. 
The purpose of this journal-book is to keep all the inspiring quotes I find on internet. I always try to make flat pages because I want to keep it thin, as it has quite a lot pages to fill in... 

This time I used silks, primary elements, 3D Gloss Gel, two stencils, two knitted flowers, a photo and black permanent pen with white paper to write the quote: 
Don't be scared to be alone. Don't be scared to like it. 
People say that artist are lonely creatures who love being alone with their thoughts and making art. Well, I think some times we all need to be alone for a while, even just to hang out with ourselves, at least that is something I love to do very often.

I found this photo on Pinterest. While printing my photo, I didn't notice that the black ink of the printer was finished. I was very disappointed  when I saw the printed photo looking not right.  Nonetheless, after a while I had some second thoughts about it... The photo didn't look bad anymore, instead it looked to me very very interested, so I decided to use it as it was :)


To create the background, first I made a custom paste with the 3D Gloss Gel Finnabair Art Basics and the Sunflower silk and used it with the rhombus stencil.  When it was dry, I used the script stencil with the Guatemala Green silk and let it dry. After that, I used the Iridescent Green and Gold silks with the old credit card. I think that iridescent paints are the best choice for dark background. They shine beautifully and create a unique effect on your projects! When the paints were all dry, I glued the photo and the white pieces of paper with the handwritten quote.

Last thing to do was to glue two small knitted flowers to give a little bit of dimension to the composition. I spread some Black Emerald primary element on them and also on some desired spots of the page. I sprayed them with water and just let the magic happen :)

(In the photo above you can see my little friend keeping company to me while I was taking the photos lol - I always take my photos outside because of the better light)


***all products by Mixed Media Place store

>>>

With this page I'm playing at Fashionable Hobbies challenge 'My favorite Material'
Iridescent silks are my favorite ever product to use when I'm working on my black journal. They shine so beautifully and I think they are the best choice for dark background!

>>>

I hope you got some ideas today on how to use colors on dark surface.
Till next time,
Have a lovely crafty day!


September 22, 2015

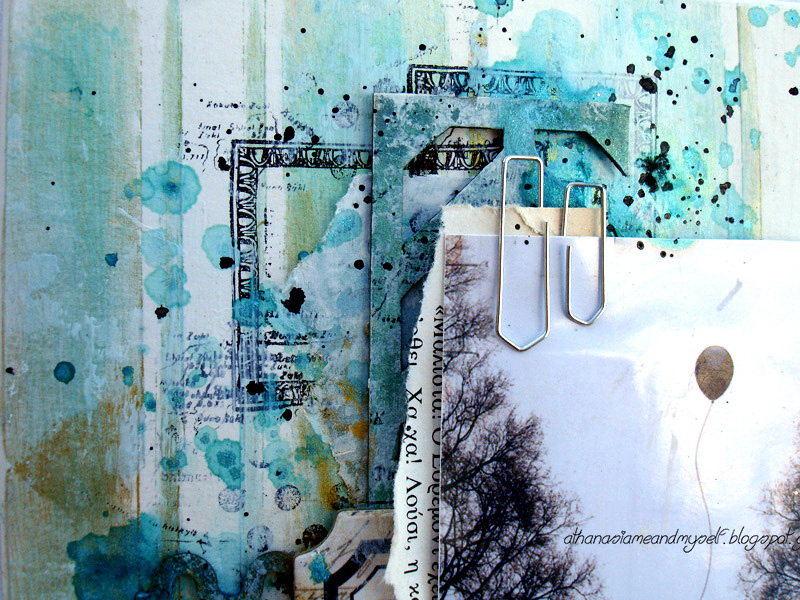
Balloon's journey

Hello dear friends! 

Today I'm hosting the Mixed Media Place.
I had this beautiful photo for a while and couldn't decide what to do with it, until now. I love the black balloon and the darkness of this photo that creates emotions of hope and sadness at the same time. 

For this project I used papers, stickers, stamps and stencil from 7 Dots Studio Soulmates, Yuletide and Lost & Found collections. I also used 2Crafty Chipboard pieces and ColourArte silks and Primary Elements to color the composition. 
First I applied white heavy gesso on the canvas. When it was dry, I used the stencil (by Yuletide collection) with the Celedin and Honey Amber silks. They dry pretty quickly. Then I made some stamps and glued the papers. The background work was done already. 

Next thing to do was to alter the chipboards. I used three shades of LSG embossing powders, blue, grey and black.  After I placed them in composition, I glued the stickers and the rest of the embellishments.

One thing I love to do often in my projects is to use wire in different ways. This time I tied it on a button and rumpled the edges to create a messy look. I really like the effect and dimension it gives at the composition.

I also like to use paper clips even I'm working on a canvas. I think they are so cute to use in any kind of project, don't you think?

As final touches I spread some of the Primary Elements blue shades here and there and sprayed water. It's the most fun thing to do before I finish my project :)
***supplies from Mixed Media Place store

That was all for today! 
Until next time, have a lovely crafty day!