Showing posts with label Lindy' s Stamp Gang. Show all posts

July 18, 2018

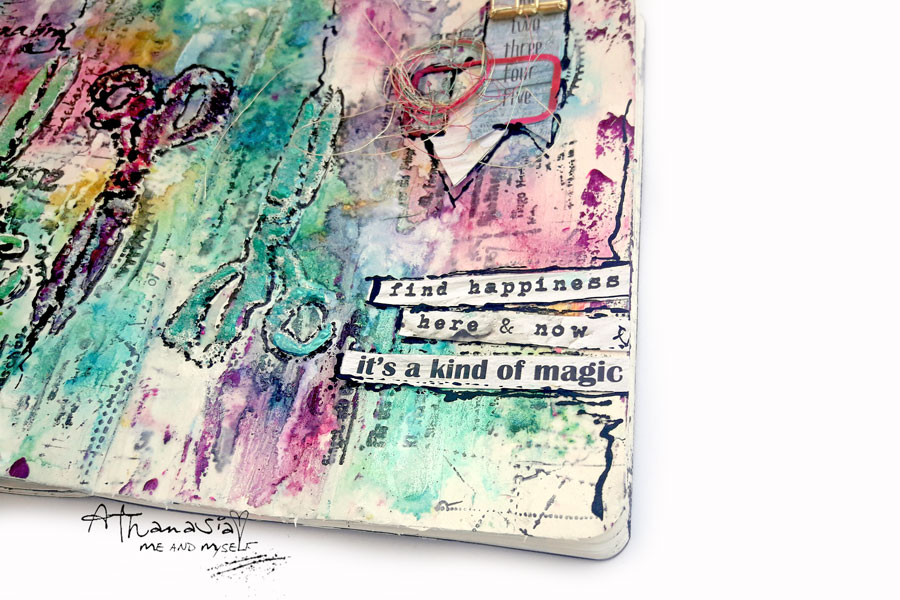
mini art journal | Scissors page


 Hello and welcome back to my blog!
This is my new mini art journal page I created for July Art Journaling You Tube Hop.

*UPDATE: scroll down to see the list with the lucky winners!


To find out on how to participate in the fun and win amazing prizes by our sponsors,
visit my channel and watch the process on how I created my page.
Just make sure to leave a comment and subscribe ;)


✪ supplies list ✪ - Prima Art Basics Heavy Gesso White - Black embossing powder Lindy's Stamp Gang - Versamark glue pad - ColourArte Primary Elements - ColourArte Radiant Gels - Prima Art Basics Light Paste - Prima clear stamps by Finnabair - Prima stencil 'Scissors' by Finnabair - Archival Ink Black - 7 Dots Studio Element Stickers 'Verano Azul' - 13 Arts clear glass powder - thread - black permanent pen - white acrylic paint - black acrylic paint


Thank you for visiting.
Have a lovely crafty day!

Athanasia


*update

January 27, 2016

Walk Alone In Darkness

Hello everyone!
This is one more page on the black journal I created for 2 Crafty Chipboard.


I like making pages with quotes I love in my black journal.
For this one I used some small butterflies of the Butterflies set to represent the crowd and one big Marianne's Butterfly to be main character of the quote.
I also used some pieces of the Circle Lace Panel - I think it matches so beautifully with the butterflies.


First I glued all the chipboard pieces on the page and then I painted them with black and white Gesso to create a light and dark shading all over the page...


For the small butterflies I used ColourArte sprays to color them and Lindy's Stamp Gang embossing powders with stamps on them and also on the background to embody them on it.


For the big butterfly I used iridescent silks to color it. They really make the perfect paint for black surface. I also used a White UniBall pen to make some doodling on it and also write the quote.

2Crafty chipboard Used

Butterflies
Marianne's Butterflies
Circle Lace Panel

Butterflies (unit of 3)  Marianne's Butterflies (unit of 3)   Circle Lace Panel (units of 3)


Thank you for visiting!
Have a lovely crafty day!
xxx
Athanasia

January 22, 2016

'You are Unique' layout for Finnabair CT

Hello dear friends! 
Today I'm hosting Finnabair's blog with a layout and a video tutorial!


I found this amazing photo on Pinterest and thought it would be perfect to express some thoughts and personal believes: How awesome is to be me! To be different from the rest of the crowd and feel good about it! 
So, I created a layout full of colors, contrast, little messages, butterflies and a really beautiful elephant :)

For this project I used a lot of butterfly stamps in different shapes - you can find them in Rust&Dust and Dream On sets. I decided to cut out my stamped butterflies and turn them into 3D embellishments to decorate the composition.
I also used a Lace stencil in a different way, 2 shades of Mica Powder (Green and Purple), Heavy White Gessoand of course a lot of Glass Beads and Glass Glitter mixed with 3D Gloss Gel.

You can see the whole process in my video below.

Here are some details...


I hope you will find my video inspiring and get some new ideas!

>>>

To create this page I got inspired by this amazing color pallet at  Berry71Blue...

...and followed this sketch from Art Sandbox

>>>

Thank you for visiting!
Have a lovely crafty day!
xxx
Athanasia

January 1, 2016

Trust your own madness


Καλή χρονιά σε όλους!
Εύχομαι το 2016 να είναι μια υπέροχη και δημιουργική χρονιά γεμάτη χαρά και υγεία!
Όπως κάθε μήνα, στο Scraps N pieces σας έχουμε μία ολοκαίνουρια προκληση:

We are all mad here


 Βρείτε μία τρελή, αστεία, παλαβή φωτογραφία! Θυμηθείτε μια τρελή στιγμή, κάτι παλαβό που κάνατε... Journal a quote για την τρέλα... ή εμπνευστείτε από την Αλίκη στη χώρα των θαυμάτων... τραπουλόχαρτα, τρελές γάτες... τσαγιέρες... ;)
O τίτλος ελεύθερος 
Φτιάχνετε ότι θέλετε όπως πάντα, είτε σύνθεση, κάρτα, art journal σελίδα,
mixed media καμβά, altered item...
Για τη σελίδα μου στο Μαύρο Journal χρησιμοποίησα:
 2Crafty Chipboard για τη λέξη MAD, Finnabair βίδες - διπλόκαρφα, και πλαστικό χόρτο.
Αφού το κόλλησα πρώτα, τα έβαψα με ιριδίζοντα silks της ColourArte.
Επίσης χρησιμοποίησα μάυρη Lindy's Stamp Gang embossing powder και Finnabair Glass Glitter τα οποία κόλλησα με  3D Gloss Gel. 
Για να γράψω τον τίτλο χρησιμοποίησα το Uni-ball άσπρο στυλό, με το οποίο έκανα και μερικά doodles (πώς είναι αυτό βρε παιδιά στα ελληνικά; χαχα) γύρω από τις βίδες
-οι βιδες ειναι συμβολικές όπως ελπίζω να καταλάβατε, χαχα- 

..........
Hello dear friends and Happy New Year!
This is our brand new challenge at Scraps N pieces.
.........
I made a page at my black journal about the madness some of us have in our personality.
Of course I mean the good madness, the kind of madness all artists have :)
If you can trust your own madness, you can do amazing things while you creating, don't you think?
For my project I used 2Crafty Chipboard letters, some Finnabair screw brads and plastic grass.
I painted all with Iridescent silks by ColourArte.
I also used a little bit of Lindy's Stamp Gang black embossing powder here and there, as well some Finnabair Glass Glitter with 3D Gloss Gel. 
For the tittle and the doodling I used the Uni-ball white pen. 
Here are some details...


***Μπορείτε να βρείτε όλα τα υλικά στο Scraps&Pieces Emporium
***You can find all supplies of this project at Scraps&Pieces Emporium

I hope you will play at our MAD challenge!
I can;t wait to see your mad projects :)

Λοιπόν, τι λέτε? Θα παίξετε στην τρελή πρόκλησή μας?
Περιμένω να δω τις όμορφες δημιουργίες σας!

xxx
Athanasia

December 7, 2015

Winter Fairy Tale

Hello dear friends!
Today I'm hosting the Finnabair blog with a winter fairy project.


I had this small 4x4 inch frame for a long time and finally decided to do something with it. It is actually a shadow frame, made out of paper mache, so I wanted something to fit inside. 
As I was looking through my stash, I found this little fairy, which I made using a mold and plaster many years ago and what a surprise - it was the perfect size for my shadow frame! 
So, the idea was to create a wintery fairy scene inside the shadow frame.

I kept looking through my stash and I found some beautiful Mechanical leaves and small flowers that looked just perfect on the little frame. I used a couple of brads to join them together and then a pliers to blend them in order to fit them onto the frame. 
Mechanicals are flexible and that makes it very easy to change their shape. For the tittle I used a tiny word 'Treasure' by 2Crafty Chipboard. 

Next step was to paint them all with Black Gesso. I chose Black Gesso instead of White because later on I used Gold Opal Magic Mica Powder and I really love the effect on black surface.
When it was dry I made custom paints with Mica Powders (Gold Opal Magic, Rust, Frozen Lake, Deep Water, Bottle Green) and Soft Matte Gel and painted the frame and the fairy.
First I used all the colors, but at the end I painted everything one more time with Rust and Opal Gold because I wanted them to be the main colors of the composition.

I also used White Crackle Paste on the frame. I let it dry and again painted it with the custom Rust paint. After they were all dry, I glued some glossy grass, a flower and the fairy inside the frame and spayed white Lindy's Stamp Gang spray on and around the fairy. I also painted with Black Gesso the edges of the frame in order to make more dark shading around the composition.

Last step was to spread some Art Ingredients here and there, mostly around the fairy and in the center of the flower. I  played with Pearl and Sterling Glass Glitter as well Silver Micro Beads and White Art Sugar. I love combining different types of Art Ingredients and creating varied effects in every project. I used 3D Gloss Gel as a glue. It dries clear and gives a beautiful shine.

***you can find full list of products of this project here

...

I hope you got inspired by my wintery fairy scene!
Have a lovely crafty day!

xxx
Athanasia


September 24, 2015

The sound of silence

Hello dear friends!
Today I'm sharing my second project for this month I created for  2Crafty Chipboard blog.


'The music is not in the notes, but in the silence between' - W.A.Mozart
This is an amazing quote I always have in mind when I'm playing the piano.
As a musician I love making projects about music, so I decided to make one with this favorite quote of mine. 


For my page I used the word "love" as the main title, which I cut from the love border.
I really like the calligraphy style of it and I think it has the perfect size for the tittle.
I altered it with black embossing powder and placed it vertically to much the whole vertically flow of the page.

 I also used some pieces from the 6x6 'Moroccan Panel' in order to give texture and interest to the background. I absolutely love this design. It matches with any kind of style and it is very easy to cut it in pieces and use them on your projects. I used black and white gesso and silks to alter them.

This big key from the 'Vintage Keys' set was the perfect embellishment to complete my composition, because it represents the key of perfection in what has to do with music.
I painted it with African Jade silk, my favorite color, and a little bit of black and white gesso.

***silks and primary elements by ColourArte
***embossing powders by Lindy's Stamp Gang

2Crafty Chipboard products used on this project:
LOVE border
Vintage Keys set
6x6 'Moroccan Panel

Love Border (unit of 3)
Moroccan Panel (units of 3)Vintage Keys (unit of 3)


Have a lovely crafty day!