January 17, 2016

art journal page with video tutorial

Happy Sunday everyone! 
Today I'm hosting the ColourArte blog with a journal page and video tutorial.

For this project I used:

ColourArte products:
Other products:
  • 2Crafty chipboard
  • White gesso
  • 3D Gloss Gel
  • Finnabair glass beads and glitter
  • stencil
  • black permanent pen
  • 7Dots Studio scraps
  • black embossing powder
  • stamps
Here are some details...


...and now you can watch the whole process.
I hope you will enjoy watching it :)


 ***you can buy a journal like this at The Journal Shop

Thank you for visiting,
have a lovely crafty day!

January 11, 2016

Tiny canvas 'LOVE'

Hello dear friends!
Today I'm sharing a tiny canvas I created for 2 Crafty Chipboard
for a friend of mine as a present.

It only measures 8x7 cm and I really love how small and cute it looks.
Even thought it is so small I managed to use 7 chipboard pieces and 2 metal pieces  to create a dimensional cluster like a pyramid!
This is how it looked before I altered the chipboards and paint it all.

In order to alter the chipboard pieces I used H2Os watercolors and silks by ColourArte and black embossing powder by Lindy's Stamp Gang.

First I created a mixed media background and then I started gluing all the embellishments with 3D Gloss Gel.

I really love how this tine mixed media pyramid looks!
Here are some closeups with details...


2Crafty chipboard Used

ATC Tiny Hearts and Stars
ATC Words 1
Spiral Snowflakes
Fluer Arrows
Hearts
Card Word Circles (I used only the circle)
6'' Circle Revolution Frames ( I used the center of the frame)

ATC Tiny Hearts & Stars  (units of 3)  Card Word Circles - Sentiments (unit of 3) 6" Circle Revolution Frames (units of 3)
 ATC Words 1 (units of 3)

   Spiral Snowflakes (unit of 3)  Hearts (units of 3) Fluer Arrows (units of 3)


>>>

With project I'm entering the 13 Arts 'Shine' challenge.
I used Shimmering H2O watercolors, Glitter and Glass Glitter on the chipboard pieces and also on the background.


>>>

Thank you for visiting!
Have a lovely crafty day!
xxx
Athanasia


January 2, 2016

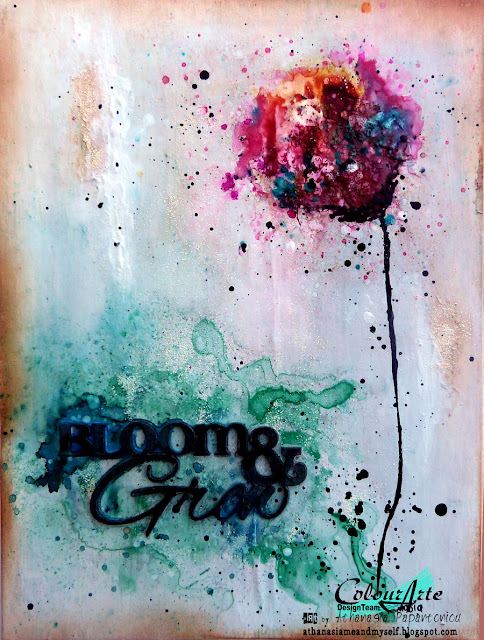
Bloom and Grow

Hello everyone!
Today I'm hosting the ColourArte blog with a small canvas I created for my art wall.


After quite a few Christmas projects, today I'm sharing a small canvas I created for my art wall.
For this project I used:
ColourArte products:


  • H2Os Shimmering Watercolors: Black Emerald, Vanilla Bean, Playful Peony, Summer Breeze, Lemondrop, Apple Blossom, Midori Melon, African Jade, Mistique
  • Radiant Rains Misters: Sunburst, Ocean Wave, Apple Blossom, Teal Zirgon
  • Primary Elements: Blue Grass


  • Other Products:
    • 2Crafty Chipboard sentence 
    • butter embossing powder
    • Finnabair Glass Glitter
    • 3D Gloss Gel
    • Heavy White Gesso
    • Vintage Photo distress ink
    • glue

    First I applied White Gesso all over the surface. Before it was dry, I made some splashes with all the H2Os and blended them with the White Gesso with my paintbrush to create a soft pastel background. I let it dry.

    Then I spread some butter embossing powder here and there and melted it with the heat gun.

    Next step was to glue the chipboard sentence. I spread some water and with the paintbrush I applied the Apple Blossom H2O. I really love this watercolor effect! I also spread some Blue Grass Primary Element and sprayed water to liquefy it.

     To create the flower I sprayed with the Radiant Rain Misters and made a lot of splashes with all the colors of H2Os I listed above. I also glued with the 3D Gloss Gel some glass glitter in the middle of the flower.

    In order to create the stalk of the flower I used the Black Emerald with a fine brush. I also made some splashes with it.


    My final step was to distress the edges with the Vintage Photo distress ink.


    I hope you got some inspiration and ideas on how to create a watercolor look on your project.
    Thank you for visiting,
    have a lovely crafty day!