Showing posts with label bloom. Show all posts

January 2, 2016

Bloom and Grow

Hello everyone!
Today I'm hosting the ColourArte blog with a small canvas I created for my art wall.


After quite a few Christmas projects, today I'm sharing a small canvas I created for my art wall.
For this project I used:
ColourArte products:


  • H2Os Shimmering Watercolors: Black Emerald, Vanilla Bean, Playful Peony, Summer Breeze, Lemondrop, Apple Blossom, Midori Melon, African Jade, Mistique
  • Radiant Rains Misters: Sunburst, Ocean Wave, Apple Blossom, Teal Zirgon
  • Primary Elements: Blue Grass


  • Other Products:
    • 2Crafty Chipboard sentence 
    • butter embossing powder
    • Finnabair Glass Glitter
    • 3D Gloss Gel
    • Heavy White Gesso
    • Vintage Photo distress ink
    • glue

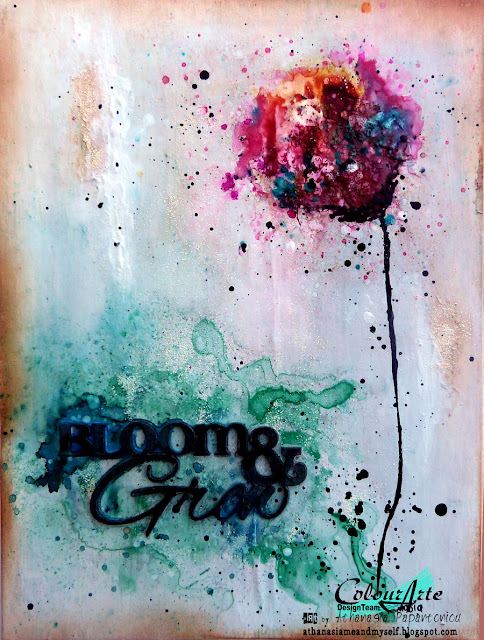
    First I applied White Gesso all over the surface. Before it was dry, I made some splashes with all the H2Os and blended them with the White Gesso with my paintbrush to create a soft pastel background. I let it dry.

    Then I spread some butter embossing powder here and there and melted it with the heat gun.

    Next step was to glue the chipboard sentence. I spread some water and with the paintbrush I applied the Apple Blossom H2O. I really love this watercolor effect! I also spread some Blue Grass Primary Element and sprayed water to liquefy it.

     To create the flower I sprayed with the Radiant Rain Misters and made a lot of splashes with all the colors of H2Os I listed above. I also glued with the 3D Gloss Gel some glass glitter in the middle of the flower.

    In order to create the stalk of the flower I used the Black Emerald with a fine brush. I also made some splashes with it.


    My final step was to distress the edges with the Vintage Photo distress ink.


    I hope you got some inspiration and ideas on how to create a watercolor look on your project.
    Thank you for visiting,
    have a lovely crafty day!

    February 3, 2015

    Bloom in the winter

    Hello! Today I'm hosting the Lindy's Stamp Gang blog to share a layout inspired by the February’s Color Challenge. The colors are amazing, I just love this mix of dark and bright colors! This time I decided to make a different color combination than I did with the first project and use the dark green 'Frolic in the Forest Black' with the dark pink 'Bougainvillea Fuchsia'!


    I tried to keep it simple and use only a few media, in order to create a contrast between the bright photo and the background. I applied gesso with a flourish mask, and after heating it I sprayed water. Then I let the fun begin: I did a lot of splashing with the Frolic in the Forest Black in order to create this beautiful background - I love the way it looks! 


    When I was satisfied with the result, I glued the photo and all the embellishments. Then I used the Bougainvillea Fuchsia to make a few drops around the spots with the flowers and title. 


    I could not finish my project without using embossing powders. As I didn't use any chipboard pieces, I decided to spread a little bit of Razzleberry Plum and Obviously Black  here and there on the page, the embellishments and the tittle.


    Well, that was all! With only a few steps you can also create a page like this. Pretty easy, don't you think?
    I hope I'll see your projects for our  February Color Challenge!

    >>>

    For my layout I used this amazing sketch from Fairy's Challenge:

    >>>

    Thank you for stopping by today, have a lovely Sunday!