Showing posts with label Acrylics. Show all posts

January 31, 2017

My Black Journal - textured background for Donna Downey Artist Gang

Hello everyone!
I'm so excited to share my first project for Donna Downey Artist Gang!!!
Here is my new page in my black journal.

I hope you will like it and you will enjoy the process in my video below :)
Don't forget to leave me a comment, 
as well give me thumbs up and subscribe on my You Tube channel  :)


Supplies from the Donna Downey store:
https://www.donnadowney.com/collections/daniel-smith-watercolors/products/daniel-smith-extra-fine-watercolor-15ml-tube-quinacridone-pink
https://www.donnadowney.com/collections/daniel-smith-watercolors/products/daniel-smith-transparent-pyrrol-orange
https://www.donnadowney.com/collections/daniel-smith-watercolors/products/daniel-smith-extra-fine-watercolor-15ml-tube-amazonite-genuine
https://www.donnadowney.com/collections/daniel-smith-watercolors/products/daniel-smith-extra-fine-watercolor-15ml-tube-buff-titanium
https://www.donnadowney.com/collections/stamps/products/you-are-important-stamp-set


Thank you for visiting!
Have a lovely crafty day!

xxx
Athanasia


December 10, 2016

My Black journal - She lived forever

 Hello dear friends!
Today I'm presenting a special project I created for Finnabair CT,
doing wonders with Art Alchemy paints and an unexpected 'art supply' on my black journal.
I hadn't made any page in my black journal for a while and I really missed working on black background!
Of course I went for something colorful as usual, with a vintage touch and a photo from the Ephemera Vintage Collectibles helped me a lot to create this special 'olden days' atmosphere.


As I wanted to mix modern and vintage styles, I decided to create a peeled paint effect background.
First thing to do was to seal my page with the Clear Gesso.
In order to create the background I used my favorite shades of Art Alchemy paints and...Vaseline! That's right! Vaseline is oil based, so it resists the water based paints and creates the peeled effect. It is a very pleasant technique, you will see the whole fun process in my video below.


When my acrylic paints were dry, I used the Clear Crackle Paste (which is lately turning out to be my fave product) right onto the paints and let it dry naturally to get perfect results. I absolutely love the final look!

To embellish my page I used 7 Dots Studio stickers and some handmade butterflies I created with the 'Don't forget to fly' cling stamps set and black embossing powder.
I also used a couple of chipboard pieces which I painted white with Heavy White Gesso.

Last thing to do was to doodle on the photo with a black pen and make some splashes with the Art Alchemy paints and White Gesso.

Here is my video with the whole process. I hope you will enjoy it and get inspired. :)


*Scroll down on this post to find a full products list


Thank you for visiting
have a lovely crafty day!
xxx
Athanasia

September 26, 2016

Circles and Butterflies create happy thoughts!


Hello dear friends!
Today I'm sharing a new page I created in my Denim Journal
 for Finnabair CT with a video tutorial.

I really love that I can add more and more pages in there and they can be worked out of the journal - it makes my job easier!

For my page I used watercolor paper which I cut to Denim's size. I incorporated the two things I enjoy most having on my journal pages: butterflies and circles.

The circles are the leftovers from a chipboard board I had in my stash and I used my favorite shades of Art Alchemy Acrylic Paints to color them.


In order to create a mixed media background I used Heavy White Gesso with stamps to create texture (you will see this technique in my video below) and Modeling Paste with the Honeycomb Stencil. I also used some clear stamps with black Archival Ink.


The butterfly is handmade and I love this tiny Star Brad I used to decorate it, it's so cute!
For my quote I used a die cut element from the 7Dots Studio Verano Azul collection, as well a sticker with a big star to embellish my page with some black thread.

Last thing to do was to glue three Melange Art Pebbles to add more interest to my page. Luckily I found in the jar the perfect size of pebble to fit the chipboard circles. I love how they look in there!

In the video I made especially for you, you can watch how I put together this journal page.


***you can visit this post for full supplies list with links.

I hope you got some inspiration from toady's project and create your own page in your Denim Journal!

Thank you for visiting
Have a lovely crafty day!
xxx
Athanasia

July 3, 2016

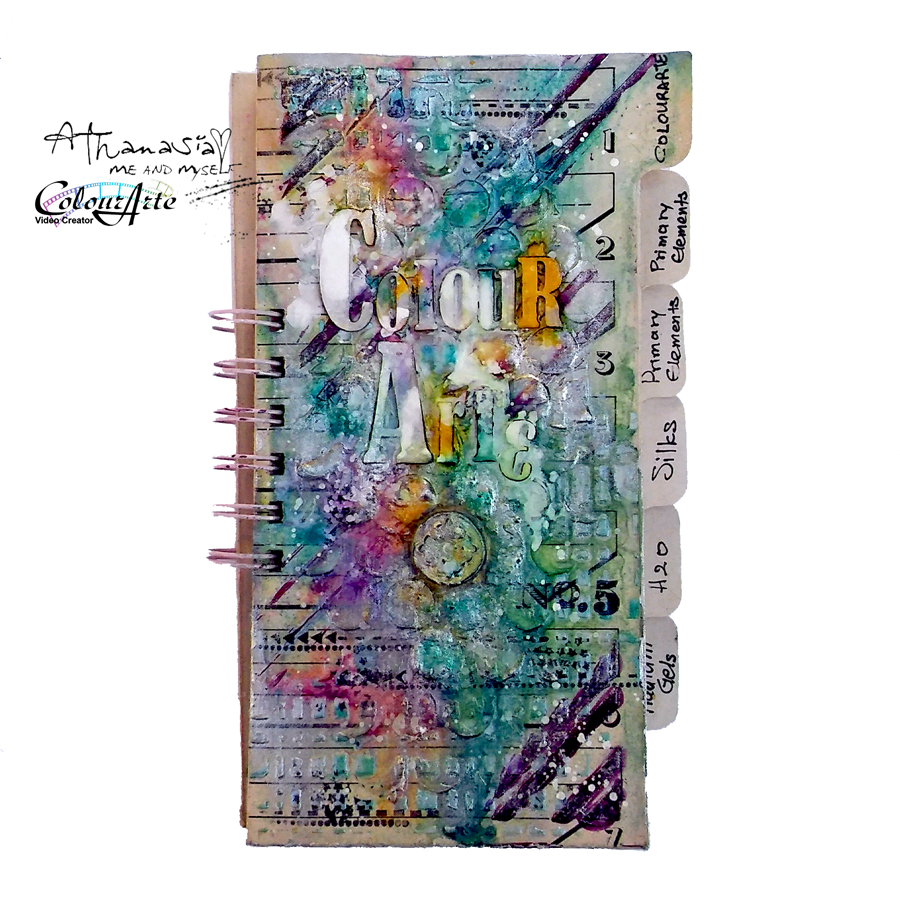
Colorchart book for ColourArte - making the cover

Happy Sunday dear friends!
Time for some inspiration with video tutorial for ColourArte!


I created this cute little book with file folders. 
You will see at my video how to add more pages using a file folder, scissors and a cropadile,
as well how I created the cover of the book.

I'm already using this book as a colorchart with all my ColourArte products.
The file folders were perfect for this project, because they have these cute labels overhanging and help me find the categories of the color products in no time!


I hope you will enjoy the video and get inspired!
 Don't forget to leave me a comment, as well give me thumbs up on my You Tube channel  :)


ColourArte supplies list for this project:

Primary Elements
Teal Zirgon
Blue Grass
Pink Azalea
Sumflower
Pear Blossom
Coral Berry
Rose Gold

Radiant Gels
 Blue Pearls
Celedon
Vavoom Red

H2Os
Siam White

Vivid Ultra Metallic
True Silver

The Solution
...

some details


Thank you for visiting,
have a lovely crafty day!

xxx
Athanasia


June 24, 2016

'Lucky 13' - tiny canvas with video

Hello dear friends!
Today I'm hosting the Finnabair blog with a small project,
my third tiny canvas, with a video tutorial.

They say that 13 is an unlucky number. But what if we could define our own luck, stop being superstitious (I never was or will be, that's for sure) and decide to take chances even from things we never believed we could and even more at the end number 13 would be a lucky number? 
Well, today's project is not about number 13, it's about being optimistic, take risks and create our own luck!


I was really in a pleasant mood when I was creating this project and I think this mood shows up in the final result. I wanted to use bright colors that make me happy and what would fit better than the beautiful combinations of blue, pink, yellow and green of the Alchemy Acrylic Paints?

I painted everything with all these beautiful colors, even the metallic embellishments like this cute Mechanical Butterfly and the frond part of an old hand-watch I  had in my stash.


Before I glue down the watch I filled it with different Art Ingredients like the Art Stones and Mini Art Stones (I so love these stuff!) and Bronze Micro Beads. Then I used 3D Gloss Gel to glue it on the canvas and make sure it won't go anywhere!

I used my Silicon Brush to apply different texture pastes and create an interesting textured background...

To make it even more cute I used Jump Rings to hang some trinkets like this cute tassel, Roman Numbers (which actually is number 10 and number 3:), a gear and the title I made from a 7Dots Studio sticker.


Here is my video with all the process. I hope you will enjoy it and get some ideas on how to create your own lucky piece of art.


***You can find a list of supplies in this post - Just scroll down ;)


Thank you for visiting,
have a lovely crafty weekend!
xxx
Athanasia