Hello dear friends!
Today I'm sharing a BIG project, the biggest I ever created lol
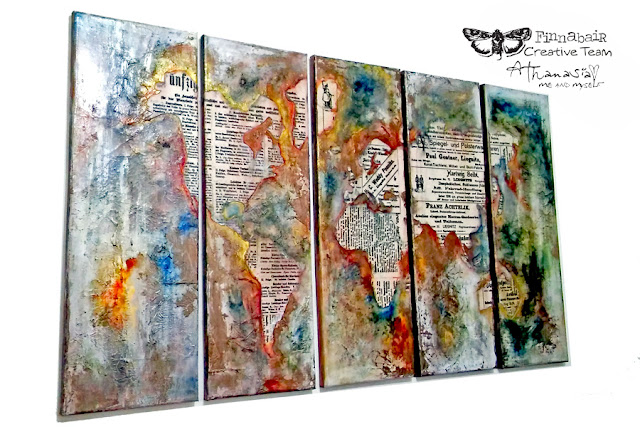
The whole project measures 1 meter (5 canvases 20x60cm each), it took me many many days to finish it and now I'm very proud it's hanging on my wall :)
I used lots of amazing Finnabair products to create it
- scroll down on Finnabair's blog post here to find the supplies list with links.
I was keeping for a long time two amazing resist canvases, designed by Finnabair, to make something special.
The time came when I found incidentally on Pinterest some ideas with world map art like wallpapers, digital collages and art pieces. I was very excited, so I decided to make my own piece of art in my own way.
Here is how I started
1. First I secured the 5 canvases together with masking tape. This made my work much easier in the next steps.
2. Then I cut very carefully with scissors the land pieces of a map that was the same size as my canvases and this way I created a large stencil. I didn't throw away the cut pieces...
3. I used them as masks to create the land for my project. I placed all the pieces one by one on the resist canvases and I draw the outline with a pencil. Then I cut them with scissors and put them aside.
4. When I was done with cutting the land, I placed my handmade stencil on the canvases and put each one of the cut resist canvas pieces in the right place. This was a little tricky as there were too many small pieces especially for the islands, but it helped me to learn some geography lol :)
5. Before I glued down the lands, I used the Silicon Brush to give the whole surface a thick layer of Heavy White Gesso and let it dry. To glue the resist canvas pieces I used the Clear Sculpture Medium - it was really the perfect glue for this work! I let it dry outside for a couple of hours.
6. After it was dry I started working with the sea sections. I used the Clear Sculpture Medium again with napkins. I glued them randomly and wrinkled to create texture. This gave also depth and interest in the finished project. I left it overnight to dry...
7. The painting part was so fun, it was really worth waiting for...
I made custom paints with the Soft Matte Gell and Mica Powders and started painting all over the canvaces, here and there, without much thinking. I used mostly the Rust Mica Powder (I love this color), as well as Gold and blue shades of Frozen Lake and Deep Waters. I also used some similar shades of Primary Elements.
When the first layer of paints was dry, I used a couple of warm colors of Art Alchemy Paints, Pure Sunshine and the Fresh Orange, as well some white acrylic paint to lighten the project.
I love how all these colors blend together, highlight the texture of paper napkins and contrast the beautiful lands of the resist canvas pieces!
I hope you got inspired from my project.
Thank you for visiting,
have a lovely crafty day!
xxx
Athanasia


