Showing posts with label Finnabair Acrylics. Show all posts

December 2, 2018

My black Journal / new page, new video

Hello dear friends!!!
I'm back with another page in my black journal.


I created this page for a Mixed Media You Tube Hop inspired by this moodboard


Here is my video


✪ Hop Rules ✪ - Like each video - Leave a comment on each video - Subscribe to all channels that join this hop to have a chance on winning a prize. The giveaway will be open to join until December 15th Winners will be announced on Monday December 17th in the first comment on all video’s and in reply to the winners comments So be sure to check back on the video’s The winners have 1 week to claim their prize
✪ Hop Sponsors ✪ A Flair for Buttons - 2 sets of flairs of winners choice Fabscraps - 2 times 5 stencils Wow Embossing Powders one £20 or $20 gift card. Visible Image a £20 gift certificate Dusty Attic Keren Tamir-- Mixed Media Prize Pack


Thank you for visiting!
Have a lovely crafty day,
have fun with the HOP
and good luck!

xxx
Athanasia

May 19, 2018

mini art journal | You Tube Hop

Hello dear friends and welcome back to my blog!!!

It has been a really long time since my last post,
but today I'm back with a new mini art journal page, with a VIDEO tutorial :)


I was invited to participate in a YOU TUBE Art Journaling HOP
with some of the most amazing and talented ladies.
What a honor, woo hoo!

Visit my channel to find out on how to participate in the fun and win amazing prizes by our sponsors!
Just make sure to leave a comment and subscribe ;)
Here is my video...


>>> supplies list <<<

- Gel Press printing plate - ColourArte Vivid acrylic paint: Jasmine, African Jade, Silver - ColourArte Primary Elements: Go Navy, Fresh Oregano, Sunflower, Wintermist Grey - ColourArte H2Os: Meridian Blue, Tahitian, african Jade, Siam White - Donna Downey stencil 'la rose' - Prima Art Basics Modeling Paste - Prima Art Basics Heavy Gesso White - Prima 3D Gloss Gel - Prima clear stamps by Finnabair - Archival Ink Black - 7 Dots Studio Element Stickers 'Verano Azul' - 13 Arts clear glass powder - thread - black permanent pen

... 


>>> Blog Hop Sponsors <<<
- Joggles.com - 7 Dots Studio - 49 and market - The Crafters Workshop - Snip-Art - UmWowStudio - Viva Las Vegas Stamps


Thank you for visiting!
Have a lovely crafty day!

 Athanasia 

June 25, 2017

Memory - junk album

Hello dear friends!
I' m hosting the Finnabair blog with my new project, a Junk Album, 
with a video on how I made it.

Last week my good friend Helen visited me to hang around and play with the new products Finnabair released a few weeks ago.
We ended up making a junk journal each and painting the cover with the new Impasto Paints.
I really love their heavy creamy consistency and the rich colors that make them the perfect choice for any kind of project!
And...psssst.... they are matte!!! The main reason for me to put them in the first place of my Favorite  Paints list. :)


The base of my cover was a simple paper bag so I had to seal it and protect it from the paints.

I used the Clear Gesso because I wanted to keep the natural colors of the envelope.

Then I used a roller to paint with the Impasto Paints. I painted here and there with Dark Chocolate, Jade, Bottle Green, Crimpson and Lemon Peel - you will find all the links below.

Then I used the Snow White paint to blend the colors with the white background.

Next step was to create texture to the background.
I used the 3D Gloss Gel with the Bubbles stencil. I used a heat gun to dry it all and as I wanted even more texture, I didn't stop heating it until I saw some real bubbles which were created by the high temperature. :)

To embellish the cover I used a photo from the Ephemera Vintage Collectibles collection which I cut out with my scissors and glued it down with the Soft Matte Gel.
Then I used the new Mega Art Stones. I glued with the 3D Gloss Gel only a few of them because they are really mega! I abolutely adore them!
I also used some thread and a chipboard word 'Memory' which I painted white with the Snow White Impasto Paint.
As some final touches, I used a graphite pencil to doodle around and the Pitch Black Impasto Paint to make some splashes like I usually do. :)

You will see in my video below how me and my craft buddy played with the Impasto paints and had lots of fun.


I hope you felt inspired to make your own junk album with your friends!

It is always so nice and fun to spend time with good friends and create together, don't you think?

Until next time -

have fun and create in good company!

xxx
Athanasia


April 25, 2017

my black journal - Hearts (Hurts) To Remember

Hello dear friends!
Today it is my turn to host the Finnabair blog :)


I love making pages in my black journal and today I want to share my newest one.
I think this is my first page themed with hearts in this journal. I usually enjoy making and painting butterflies and dragonflies...
I'm not really a 'hearts' or 'flowers' person and that's why I think I didn't like this page at first.
But I really wanted to try to save the page, so my good friend Heavy Black Gesso helped me to fix everything and turned this page to be one of my favorites.

I started by covering the page with Black Gesso as I always do in my black journal.
I used a plastic sheet to cut some hearts and glued them on the page as masks. Then I started working on my page.

I picked the Cobblestone stencil and one of the Stone Effect Pastes to create texture on the background. I love that it dries very quickly and you can work on it immediately after that.
You can still see the amazing texture these pastes give to the project, even that now they are covered with Black Gesso!
My idea was to paint inside the pattern of the stencil with different colors of the Sparks acrylic paints. I took my favorite shades and used a heatgun to dry them.
When the page was dry, I removed the mask hearts and... then was the point I started to not like the page so much... I tried to work a little bit more with white pens but nothing happened. I still didn't like it.
So, without a second thought I grabbed the Black Gesso and painted everything black.

I had nothing on my page but the texture of the Stone Effect Pastes and that was good enough to start creating a new page.

I also had aside the hearts I had removed off the page before. Thank God I didn't put them in the trash. ;)
They had on them all the beautiful colors of the Sparks I used before, so I glued them down and voila! The half of the work was done!

To decorate the page a little more, I added Art Stones and Mini Art Stones with the 3D Gloss Gel, some thread and made splashes with the Sparks here and there. 
I also used two chipboard words I had in my stash to title the project.

You can see in my video below how I built two pages into one. :)


I really love how this page turned out even if I had to make it twice.


I think the most important thing is to trust yourself and not to give up even when you think that you have reached a very dissapointing point.
There is always a way to fix things in life, especially a page in your journal - this is the easy part, right? :)

I wish you all a happy crafty day!

xxx
Athanasia

October 28, 2016

My ugly buttons

Hello dear friends!
I'm very excited and thankful to be invited back in Finnabair CT!
I'm looking forward to share my new projects and ideas with Finn's amazing products and I'm sure that it will be a fantastic journey for all of us!
Today I want to share an assemblage I created for Finn's blog with buttons and Art Alchemy Acrylic Paints.


I love collecting cute stuff like keys, coins, gems and alll kinds of
interesting little objects that come my way.
I've been collecting all these buttons for years, some of them are very old and I got them from my grandmother... So, I decided to create something with them.
Even I wasn' t sure how it would turn out, I knew from the beginning that I was going to cover them completely with paints, so I decided to chose all my ugly buttons and kept my favorite ones in the box.

Although it took me ages to find the right place for each one of them, I had so much fun playing - it was really like the 'TETRIS" game! You can watch the whole fun part in my video below :)


I used the 3D Gloss Gel to glue them down to a wooden base and covered everything with Heavy Black Gesso.

The most fun part of the whole process was to paint all these buttons with the Art Alchemy Acrylic Paints!

I really love how all these colors highlight the textures and different designs of the buttons.
I liked the result so much that I decided to add nothing more, even one single embellishment, but the tittle.

I used a chipboard word 'CREATE' and painted it with the White Crackle Texture Paste to add more texture and the Emerald Green Acrylic Paint, my favorite color shade.

To add even more texture to the assemblage I used again the White Crackle Texture Paste on several spots...
As my final touches I made splashes with all the colors shades I used before to color the buttons.
Here is my video with all the fun process. I hope you will enjoy it as much as I did :)


***for supplies list and links visit this post

Thank you for visiting!
Have a lovely crafty day!
xxx
Athanasia

August 26, 2016

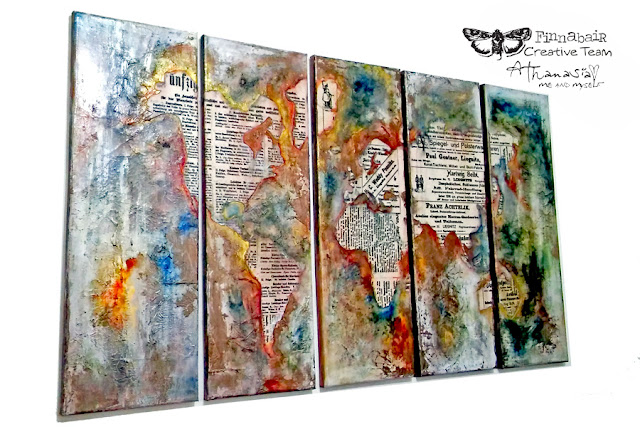
Color your world - mixed media canvases

Hello dear friends!
Today I'm sharing a BIG project, the biggest I ever created lol
The whole project measures 1 meter (5 canvases 20x60cm each), it took me many many days to finish it and now I'm very proud it's hanging on my wall :)


I used lots of amazing Finnabair products to create it
- scroll down on Finnabair's blog post here to find the supplies list with links.

I was keeping for a long time two amazing resist canvases, designed by Finnabair, to make something special. 
The time came when I found incidentally on Pinterest some ideas with world map art like wallpapers, digital collages and art pieces. I was very excited, so I decided to make my own piece of art in my own way. 

Here is how I started

1. First I secured the 5 canvases together with masking tape. This made my work much easier in the next steps.

2. Then I cut very carefully with scissors the land pieces of a map that was the same size as my canvases and this way I created a large stencil. I didn't throw away the cut pieces...

3. I used them as masks to create the land for my project. I placed all the pieces one by one on the resist canvases and I draw the outline with a pencil. Then I cut them with scissors and put them aside.

4. When I was done with cutting the land, I placed my handmade stencil on the canvases and put each one of the cut resist canvas pieces in the right place. This was a little tricky as there were too many small pieces especially for the islands, but it helped me to learn some geography lol :)

5. Before I glued down the lands,  I used the Silicon Brush to give  the whole surface a thick layer of Heavy White Gesso  and let it dry. To glue the resist canvas pieces I used the Clear Sculpture Medium - it was really the perfect glue for this work! I let it dry outside for a couple of hours.

6. After it was dry I started working with the sea sections. I used the Clear Sculpture Medium again with napkins. I glued them randomly and wrinkled to create texture. This gave also depth and interest in the finished project. I left it overnight to dry...
((Unfortunately, from this point onward I haven't any more photos of the process to share as I was so captivated with the painting part that I didn't think to take some)


7. The painting part was so fun, it was really worth waiting for... 
I made custom paints with the Soft Matte Gell and Mica Powders and started painting all over the canvaces, here and there, without much thinking. I used mostly the Rust Mica Powder (I love this color), as well as Gold and blue shades of  Frozen Lake and Deep Waters. I also used some similar shades of Primary Elements.


When the first layer of paints was dry, I used a couple of warm colors of Art Alchemy Paints, Pure Sunshine and the Fresh Orange, as well some white acrylic paint to lighten the project.

 I love how all these colors blend together, highlight the texture of paper napkins and contrast the beautiful lands of the resist canvas pieces!


I hope you got inspired from my project.
Thank you for visiting,
have a lovely crafty day!

xxx
Athanasia

May 23, 2016

Bunny in a hat *with video

Hello dear friends!
Today I'm sharing my new project I created for Finnabair Creative Team!

This is the second card I'm altering from a card set I got from Ikea a long time ago.
I had so much fun painting and decorating this cute bunny and I'm happy to share the whole process in a video with you.

I started with covering the background with Heavy White Gesso in order to mute it a little bit and used some Art Alchemy acrylic colors in shades that matched the card's colors: Fresh Orange, Royal Red, Steampunk Copper and Black Berry. 

I also used all these beautiful colors to paint the chipboard pieces and all the metal embellishments...

I love doodling on my projects and this time I used a black permanent pen, as well a white pen.

The several stamps I used created a really messy and interesting background and helped me create even more texture with a fun technique I did on White Heavy Gesso - you can watch all these tricks in the video below.

I hope you will enjoy my video and maybe get some ideas to create your altered card!


Thank you for visiting,
have a lovely crafty day!

xxx
Athanasia