I created this page for a Mixed Media You Tube Hop inspired by this moodboard
Here is my video
✪ Hop Rules ✪
- Like each video
- Leave a comment on each video
- Subscribe to all channels that join this hop
to have a chance on winning a prize.
The giveaway will be open to join until December 15th
Winners will be announced on Monday December 17th in the first comment on all video’s and in reply to the winners comments
So be sure to check back on the video’s
The winners have 1 week to claim their prize
✪ Hop Sponsors ✪
A Flair for Buttons - 2 sets of flairs of winners choice
Fabscraps - 2 times 5 stencils
Wow Embossing Powders one £20 or $20 gift card.
Visible Image a £20 gift certificate
Dusty Attic
Keren Tamir-- Mixed Media Prize Pack
I love making pages in my black journal and today I want to share my newest one.
I think this is my first page themed with hearts in this journal. I usually enjoy making and painting butterflies and dragonflies...
I'm not really a 'hearts' or 'flowers' person and that's why I think I didn't like this page at first.
But I really wanted to try to save the page, so my good friend Heavy Black Gesso helped me to fix everything and turned this page to be one of my favorites.
I started by covering the page with Black Gesso as I always do in my black journal.
I used a plastic sheet to cut some hearts and glued them on the page as masks. Then I started working on my page.
I picked the Cobblestone stencil and one of the Stone Effect Pastes to create texture on the background. I love that it dries very quickly and you can work on it immediately after that.
You can still see the amazing texture these pastes give to the project, even that now they are covered with Black Gesso!
My idea was to paint inside the pattern of the stencil with different colors of the Sparks acrylic paints. I took my favorite shades and used a heatgun to dry them.
When the page was dry, I removed the mask hearts and... then was the point I started to not like the page so much... I tried to work a little bit more with white pens but nothing happened. I still didn't like it.
So, without a second thought I grabbed theBlack Gessoand painted everything black.
I had nothing on my page but the texture of the Stone Effect Pastes and that was good enough to start creating a new page.
I also had aside the hearts I had removed off the page before. Thank God I didn't put them in the trash. ;)
They had on them all the beautiful colors of the Sparks I used before, so I glued them down and voila! The half of the work was done!
To decorate the page a little more, I added Art Stones and Mini Art Stones with the 3D Gloss Gel, some thread and made splashes with the Sparks here and there.
I also used two chipboard words I had in my stash to title the project.
You can see in my video below how I built two pages into one. :)
I really love how this page turned out even if I had to make it twice.
I think the most important thing is to trust yourself and not to give up even when you think that you have reached a very dissapointing point.
There is always a way to fix things in life, especially a page in your journal - this is the easy part, right? :)
Hello dear friends and Happy New Year!!!
My first post for this year is for Finnabair CT...
The dragonfly, in almost every part of the world symbolizes change and change in the perspective of self realization. It is that kind of change that has its source in mental and emotional maturity and the understanding of the deeper meaning of life.
So, what do I expect from 2017? Lots of changes and lots of dragonflies in my life.
I wish all of you dear friends to havethis year lots and lots amazing artful moments to fulfill your life and why not: lots of dragonflies :)
My first project for this year is making the cover of my black journal and what would be more perfect to impress a dragonfly, so to remind me this year's expectations every time I hold it in my hands.
and psssst! I also have a little secret to share... after I was done with the cover I decided to get my first tattoo: a dragonfly on the side of the wrist of my right hand!
So....let's get started with the project!
As my journal was already black, I started with a nice coat of Heavy Black Gesso to prime the cover.
After it was dry, I glued the Mechanicals parts I used for the body of the dragonfly with Heavy Body Gel and covered them with Black Gesso.
Then I placed a sketch I made on a piece of paper on the cover to shape the dragonfly, but here is the trick: I used a pin to scratch the canvas cover, than a pencil to draw the lines. This way I created an interesting texture, a 'destroyed' base all mixed media artists would love to work on ;)
Next step was to choose my paints. Well, with no second thought I grabbed my Art Alchemy Opal Magic Paints, the perfect acrylics for any black surface. They dry permanent and I loooove the amazing two-tone iridescent effect they give on dark and light backgrounds. Ιn order to reinforce this effect, I painted some spots of the wings white with the Heavy White Gesso. You will see the whole process in my video below.
After the Opal Magic Paints where dry, I used again the White Gesso to make lots of splashes.
To give even more interest on the background of the wings, I used the Clear Crackle Paste as my final touch. I let it dry overnight to get the best results.
For the tittle I wanted something simple and small, not to distract the attention from the dragonfly, so I wrote by hand the word ART with Heavy White Gesso and a black permanent pen.
Now it is time for my video. I hope you will enjoy it and get inspired. :)
*Scroll down on this post to find a full products list
Today I'm presenting a special project I created for Finnabair CT,
doing wonders with Art Alchemy paints and an unexpected 'art supply' on my black journal.
I hadn't made any page in my black journal for a while and I really missed working on black background!
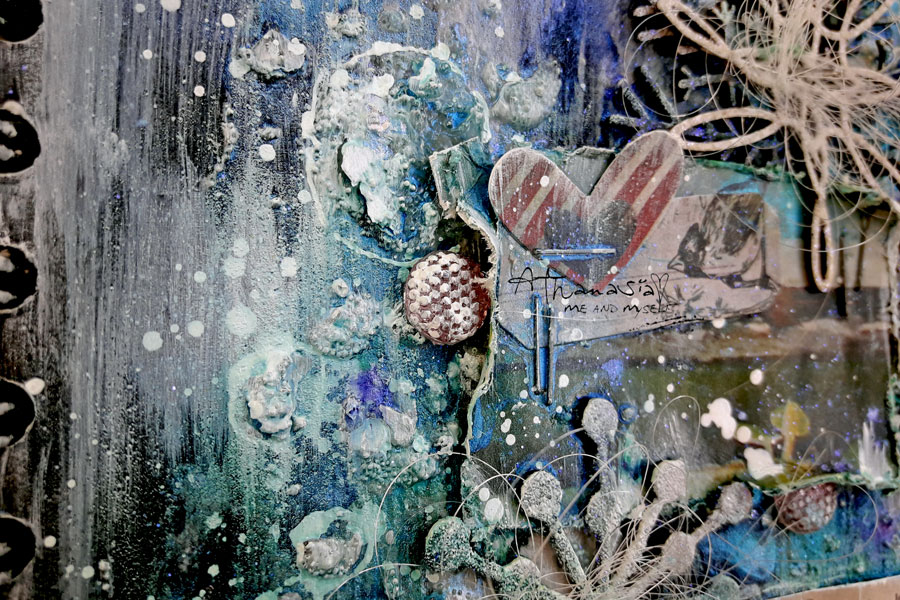
Of course I went for something colorful as usual, with a vintage touch and a photo from the Ephemera Vintage Collectibles helped me a lot to create this special 'olden days' atmosphere.
As I wanted to mix modern and vintage styles, I decided to create a peeled paint effect background.
First thing to do was to seal my page with the Clear Gesso.
In order to create the background I used my favorite shades of Art Alchemy paints and...Vaseline! That's right! Vaseline is oil based, so it resists the water based paints and creates the peeled effect. It is a very pleasant technique, you will see the whole fun process in my video below.
When my acrylic paints were dry, I used the Clear Crackle Paste (which is lately turning out to be my fave product) right onto the paints and let it dry naturally to get perfect results. I absolutely love the final look!
To embellish my page I used 7 Dots Studio stickers and some handmade butterflies I created with the 'Don't forget to fly'cling stamps set and black embossing powder.
I also used a couple of chipboard pieces which I painted white with Heavy White Gesso.
Last thing to do was to doodle on the photo with a black pen and make some splashes with the Art Alchemy paints and White Gesso.
Here is my video with the whole process. I hope you will enjoy it and get inspired. :)
*Scroll down on this post to find a full products list
The new Finnabair Art Recipe for Prima blog is here to inspire you.
Can you guess the art ingredients? :p
Snowflake Paste + Mica Powders + shimmery Glitter
Snowflake Paste is perfect for creating dimension on your projects. It has a snowy white, subtly sparkly finish when it dries, and it makes the perfect base for adding Mica Powders and Glitter! Snowflake paste is the perfect product for me to use in wintery and Christmas projects. In this project, I used it in three different ways:
1. After covering the tag (recycled Mechanicals package) with Black Gesso, I used the Stars Stencil with the Snowflake Paste and the Silicon 1' Brush. When it was dry, I covered the stars with Black Gesso. I absolutely love the texture it adds to the project!
2. My next step was to glue all the embellishments with 3D Gel. I used the Snowflake Paste again to paint the large chipboard snowflake. Apart from the white shade, it added a beautiful sparkle to the chipboard piece.
3. When I was done painting the background with the Mica Powders (pale Silver, Rust, Frozen Lake and Tangerine), I used the Snowflake paste here and there with a paintbrush to add a real snow effect to my project. As the final touch, I added some glitter from the Ebony & Ivory set to the veil of the vintage girls with the Soft Matte Gel. I also attached a cute tassel I found in the Mechanicals Tassel set with a small Jump Ring.
For more inspiration you can visit the Prima blog post to see
I'm very excited and thankful to be invited back in Finnabair CT!
I'm looking forward to share my new projects and ideas with Finn's amazing products and I'm sure that it will be a fantastic journey for all of us!
Today I want to share an assemblage I created for Finn's blog with buttons and Art Alchemy Acrylic Paints.
I love collecting cute stuff like keys, coins, gems and alll kinds of
interesting little objects that come my way.
I've been collecting all these buttons for years, some of them are very old and I got them from my grandmother... So, I decided to create something with them.
Even I wasn' t sure how it would turn out, I knew from the beginning that I was going to cover them completely with paints, so I decided to chose all my ugly buttons and kept my favorite ones in the box.
Although it took me ages to find the right place for each one of them, I had so much fun playing - it was really like the 'TETRIS" game! You can watch the whole fun part in my video below :)
I used the 3D Gloss Gel to glue them down to a wooden base and covered everything with Heavy Black Gesso.
The most fun part of the whole process was to paint all these buttons with the Art Alchemy Acrylic Paints!
I really love how all these colors highlight the textures and different designs of the buttons.
I liked the result so much that I decided to add nothing more, even one single embellishment, but the tittle.
I used a chipboard word 'CREATE' and painted it with the White Crackle Texture Paste to add more texture and the Emerald Green Acrylic Paint, my favorite color shade.
To add even more texture to the assemblage I used again the White Crackle Texture Paste on several spots...
As my final touches I made splashes with all the colors shades I used before to color the buttons.
Here is my video with all the fun process. I hope you will enjoy it as much as I did :)