Showing posts with label art. Show all posts

January 31, 2017

My Black Journal - textured background for Donna Downey Artist Gang

Hello everyone!
I'm so excited to share my first project for Donna Downey Artist Gang!!!
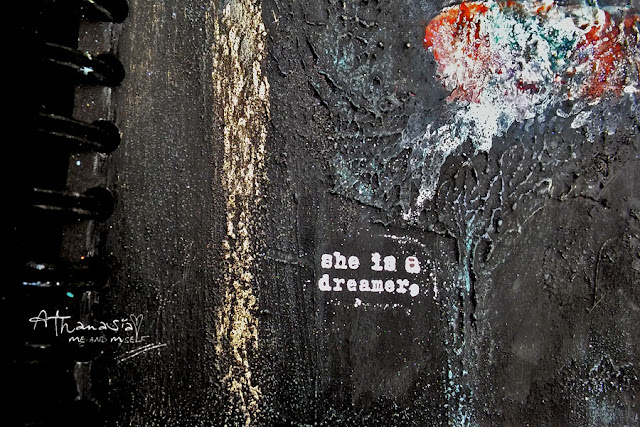
Here is my new page in my black journal.

I hope you will like it and you will enjoy the process in my video below :)
Don't forget to leave me a comment, 
as well give me thumbs up and subscribe on my You Tube channel  :)


Supplies from the Donna Downey store:
https://www.donnadowney.com/collections/daniel-smith-watercolors/products/daniel-smith-extra-fine-watercolor-15ml-tube-quinacridone-pink
https://www.donnadowney.com/collections/daniel-smith-watercolors/products/daniel-smith-transparent-pyrrol-orange
https://www.donnadowney.com/collections/daniel-smith-watercolors/products/daniel-smith-extra-fine-watercolor-15ml-tube-amazonite-genuine
https://www.donnadowney.com/collections/daniel-smith-watercolors/products/daniel-smith-extra-fine-watercolor-15ml-tube-buff-titanium
https://www.donnadowney.com/collections/stamps/products/you-are-important-stamp-set


Thank you for visiting!
Have a lovely crafty day!

xxx
Athanasia


January 9, 2017

My black journal |cover

Hello dear friends and Happy New Year!!!

My first post for this year is for Finnabair CT...

The dragonfly, in almost every part of the world symbolizes change and change in the perspective of self realization. It is that kind of change that has its source in mental and emotional maturity and the understanding of the deeper meaning of life.
So, what do I expect from 2017? Lots of changes and lots of dragonflies in my life.
I wish all of you dear friends to have this year lots and lots amazing artful moments to fulfill your life and why not: lots of dragonflies :)


My first project for this year is making the cover of my black journal and what would be more perfect to impress a dragonfly, so to remind me this year's expectations every time I hold it in my hands.

and psssst! I also have a little secret to share... after I was done with the cover I decided to get my first tattoo: a dragonfly on the side of the wrist of my right hand! 

So....let's get started with the project!

As my journal was already black, I started with a nice coat of  Heavy Black Gesso to prime the cover.
After it was dry, I glued the Mechanicals parts I used for the body of the dragonfly with Heavy Body Gel and covered them with Black Gesso.


Then I placed a sketch I made on a piece of paper on the cover to shape the dragonfly, but here is the trick: I used a pin to scratch the canvas cover, than a pencil to draw the lines. This way I created an interesting texture, a 'destroyed' base all mixed media artists would love to work on ;)

Next step was to choose my paints. Well, with no second thought I grabbed my Art Alchemy Opal Magic Paints, the perfect acrylics for any black surface. They dry permanent and I loooove the amazing two-tone iridescent effect they give on dark and light backgrounds. Ιn order to reinforce this effect, I painted some spots of the wings white with the  Heavy White Gesso. You will see the whole process in my video below.

After the Opal Magic Paints where dry, I used again the White Gesso to make lots of splashes.
To give even more interest on the background of the wings, I used the Clear Crackle Paste as my final touch. I let it dry overnight to get the best results.

For the tittle I wanted something simple and small, not to distract the attention from the dragonfly, so I wrote by hand the word ART with Heavy White Gesso and a black permanent pen.

Now it is time for my video. I hope you will enjoy it and get inspired. :)


*Scroll down on this post to find a full products list


Thank you for visiting
have a lovely crafty YEAR!
xxx
Athanasia


August 26, 2016

Color your world - mixed media canvases

Hello dear friends!
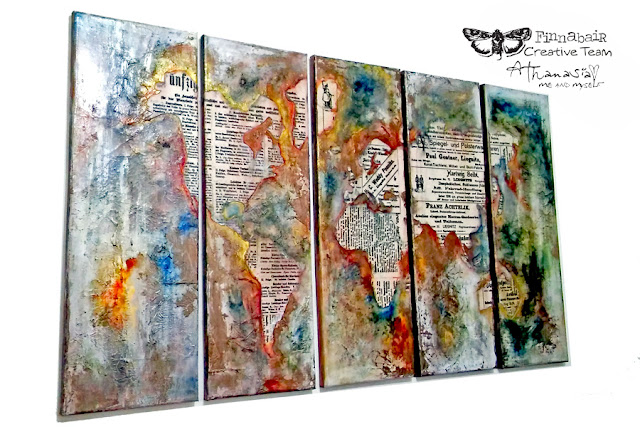
Today I'm sharing a BIG project, the biggest I ever created lol
The whole project measures 1 meter (5 canvases 20x60cm each), it took me many many days to finish it and now I'm very proud it's hanging on my wall :)


I used lots of amazing Finnabair products to create it
- scroll down on Finnabair's blog post here to find the supplies list with links.

I was keeping for a long time two amazing resist canvases, designed by Finnabair, to make something special. 
The time came when I found incidentally on Pinterest some ideas with world map art like wallpapers, digital collages and art pieces. I was very excited, so I decided to make my own piece of art in my own way. 

Here is how I started

1. First I secured the 5 canvases together with masking tape. This made my work much easier in the next steps.

2. Then I cut very carefully with scissors the land pieces of a map that was the same size as my canvases and this way I created a large stencil. I didn't throw away the cut pieces...

3. I used them as masks to create the land for my project. I placed all the pieces one by one on the resist canvases and I draw the outline with a pencil. Then I cut them with scissors and put them aside.

4. When I was done with cutting the land, I placed my handmade stencil on the canvases and put each one of the cut resist canvas pieces in the right place. This was a little tricky as there were too many small pieces especially for the islands, but it helped me to learn some geography lol :)

5. Before I glued down the lands,  I used the Silicon Brush to give  the whole surface a thick layer of Heavy White Gesso  and let it dry. To glue the resist canvas pieces I used the Clear Sculpture Medium - it was really the perfect glue for this work! I let it dry outside for a couple of hours.

6. After it was dry I started working with the sea sections. I used the Clear Sculpture Medium again with napkins. I glued them randomly and wrinkled to create texture. This gave also depth and interest in the finished project. I left it overnight to dry...
((Unfortunately, from this point onward I haven't any more photos of the process to share as I was so captivated with the painting part that I didn't think to take some)


7. The painting part was so fun, it was really worth waiting for... 
I made custom paints with the Soft Matte Gell and Mica Powders and started painting all over the canvaces, here and there, without much thinking. I used mostly the Rust Mica Powder (I love this color), as well as Gold and blue shades of  Frozen Lake and Deep Waters. I also used some similar shades of Primary Elements.


When the first layer of paints was dry, I used a couple of warm colors of Art Alchemy Paints, Pure Sunshine and the Fresh Orange, as well some white acrylic paint to lighten the project.

 I love how all these colors blend together, highlight the texture of paper napkins and contrast the beautiful lands of the resist canvas pieces!


I hope you got inspired from my project.
Thank you for visiting,
have a lovely crafty day!

xxx
Athanasia

May 1, 2016

'Memories' in a frame

Happy Sunday everyone!
Today I'm sharing a small project in a frame I created for my art wall
with ColourArte Silks acrylic paints.

For this project I used:
ColourArte products
Other products:
  • White Heavy Gesso
  • craft glue
  • wooden canvas sticks
  • 7Dots Studio 'Domestic Goddess' collection word sticker
  • black frame

So, let's get started.

First step was to paint the wooden sticks with the Silks. I chose some of my favorite colors in green, blue and grey shades and used a paintbrush to apply them on the sticks. They dry pretty quickly and I love how rich the colors look after they are dry!
I also painted some of the sticks with white gesso. 


After they were dry I used the craft glue to glue them down randomly. 

I wanted to keep it simple with a clean and clear look, so I didn't use any paint on the background. 

The only thing to do after the sticks were in place, was to glue a word sticker.


That was pretty much all! I really love the finished look and that Summer feeling it gives at my wall of art :)

Thank you for visiting!

Have a lovely crafty day!

xxx
Athanasia
March 19, 2016

Art in a frame

Happy Sunday dear friends!
Today I'm hosting the ColourArte blog 
and sharing a small project in a frame I created for my art wall.
I used only a few supplies and with only three steps I ended with a beautiful art piece.
For my project I used:

ColourArte products
Other products:
  • White Heavy Gesso
  • 3D Gloss Gel
  • wire
  • Art Stones
  • Metal Butterfly
  • black plastic grass

Step 1. I applied with a sponge a little bit of gesso all over the surface, particularly on the spot I wanted to be the circle with the butterfly.  

Step 2. I glued everything down with 3D Gloss Gel and let it dry.

Step 3. I used my favorite colors of Silks to paint the embellishments.
I sprayed some water here and there to make to paint more fluid.
I also made some splashes with the Black Ice Silk.

And that was it!
Pretty easy and quick, don't you think?
Of course it's already hanging on my wall :)

Thank you for visiting,
have a lovely crafty day!

March 13, 2016

Moment - small canvas

Hello dear friends!
This is my new project for 2Crafty Chipboard.


I found this cute photo on pinterest and decided to create a small canvas this time.
Even the project is too small, I managed to use 7 chipboard pieces in there :)
I used different media to alter the chipboard pieces.
The word 'Moment' is painted with black and white gesso.
I also used white gesso to paint the Medallion Flower . 

For the tiny Hearts I used H2O Twinkling Watercolor by ColourArte in red shade, 
becausI wanted to achieve a shiny and juicy look. 
I also used a small  paintbrush with white gesso to highlight them.


I altered the Leaves and the Polaroid Frame with green and brown shades of  Primary Elements by ColourArte  in order to give them a natural look. 
I just spread some powder of all colors here and there with a dry paintbrush 
and sprayed some water.

2Crafty Chipboards Used:

Polaroid Assortment Frames, Flower Medallions, ATC Tiny Hearts & Stars, 

Moment Loopy Font, Leafy Silhouettes, Wildflower Set


Inspiration With Athanasia  Canvas and Card By Athanasia  ATC Tiny Hearts & Stars  (units of 3)    Moment Loopy Font (unit of 3)   Wildflower Set (unit of 3)


...

To create this canvas I used this beautiful sketch by Kiev Skrapklub


...

Thank you for visiting,
have a lovely crafty day!
xxx
Athanasia

January 1, 2016

Trust your own madness


Καλή χρονιά σε όλους!
Εύχομαι το 2016 να είναι μια υπέροχη και δημιουργική χρονιά γεμάτη χαρά και υγεία!
Όπως κάθε μήνα, στο Scraps N pieces σας έχουμε μία ολοκαίνουρια προκληση:

We are all mad here


 Βρείτε μία τρελή, αστεία, παλαβή φωτογραφία! Θυμηθείτε μια τρελή στιγμή, κάτι παλαβό που κάνατε... Journal a quote για την τρέλα... ή εμπνευστείτε από την Αλίκη στη χώρα των θαυμάτων... τραπουλόχαρτα, τρελές γάτες... τσαγιέρες... ;)
O τίτλος ελεύθερος 
Φτιάχνετε ότι θέλετε όπως πάντα, είτε σύνθεση, κάρτα, art journal σελίδα,
mixed media καμβά, altered item...
Για τη σελίδα μου στο Μαύρο Journal χρησιμοποίησα:
 2Crafty Chipboard για τη λέξη MAD, Finnabair βίδες - διπλόκαρφα, και πλαστικό χόρτο.
Αφού το κόλλησα πρώτα, τα έβαψα με ιριδίζοντα silks της ColourArte.
Επίσης χρησιμοποίησα μάυρη Lindy's Stamp Gang embossing powder και Finnabair Glass Glitter τα οποία κόλλησα με  3D Gloss Gel. 
Για να γράψω τον τίτλο χρησιμοποίησα το Uni-ball άσπρο στυλό, με το οποίο έκανα και μερικά doodles (πώς είναι αυτό βρε παιδιά στα ελληνικά; χαχα) γύρω από τις βίδες
-οι βιδες ειναι συμβολικές όπως ελπίζω να καταλάβατε, χαχα- 

..........
Hello dear friends and Happy New Year!
This is our brand new challenge at Scraps N pieces.
.........
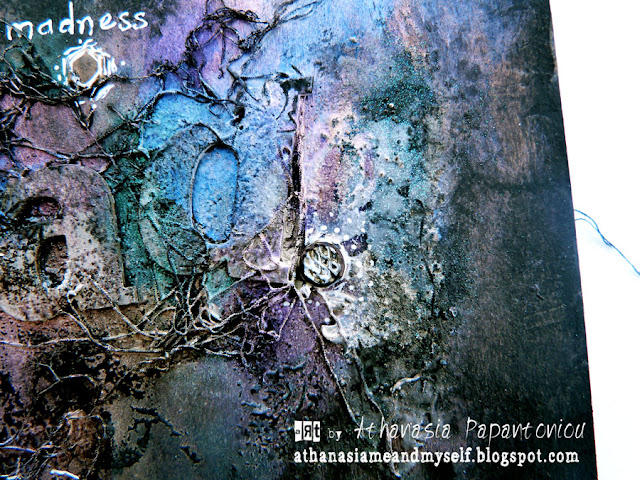
I made a page at my black journal about the madness some of us have in our personality.
Of course I mean the good madness, the kind of madness all artists have :)
If you can trust your own madness, you can do amazing things while you creating, don't you think?
For my project I used 2Crafty Chipboard letters, some Finnabair screw brads and plastic grass.
I painted all with Iridescent silks by ColourArte.
I also used a little bit of Lindy's Stamp Gang black embossing powder here and there, as well some Finnabair Glass Glitter with 3D Gloss Gel. 
For the tittle and the doodling I used the Uni-ball white pen. 
Here are some details...


***Μπορείτε να βρείτε όλα τα υλικά στο Scraps&Pieces Emporium
***You can find all supplies of this project at Scraps&Pieces Emporium

I hope you will play at our MAD challenge!
I can;t wait to see your mad projects :)

Λοιπόν, τι λέτε? Θα παίξετε στην τρελή πρόκλησή μας?
Περιμένω να δω τις όμορφες δημιουργίες σας!

xxx
Athanasia