December 10, 2016

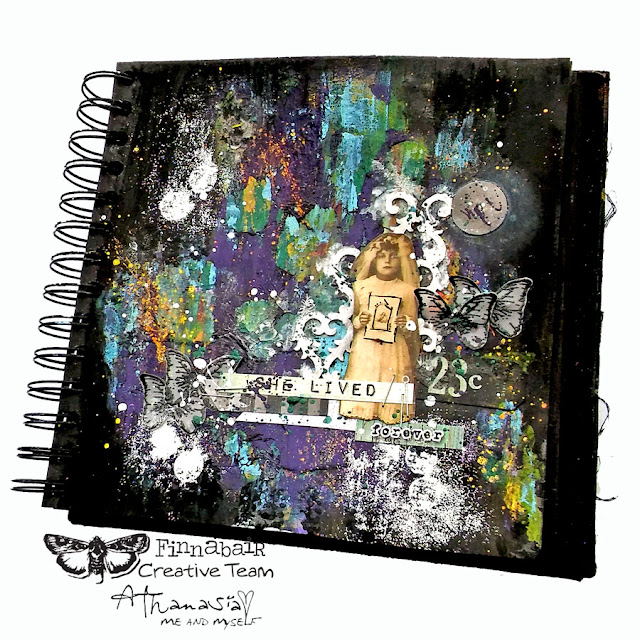
My Black journal - She lived forever

 Hello dear friends!
Today I'm presenting a special project I created for Finnabair CT,
doing wonders with Art Alchemy paints and an unexpected 'art supply' on my black journal.
I hadn't made any page in my black journal for a while and I really missed working on black background!
Of course I went for something colorful as usual, with a vintage touch and a photo from the Ephemera Vintage Collectibles helped me a lot to create this special 'olden days' atmosphere.


As I wanted to mix modern and vintage styles, I decided to create a peeled paint effect background.
First thing to do was to seal my page with the Clear Gesso.
In order to create the background I used my favorite shades of Art Alchemy paints and...Vaseline! That's right! Vaseline is oil based, so it resists the water based paints and creates the peeled effect. It is a very pleasant technique, you will see the whole fun process in my video below.


When my acrylic paints were dry, I used the Clear Crackle Paste (which is lately turning out to be my fave product) right onto the paints and let it dry naturally to get perfect results. I absolutely love the final look!

To embellish my page I used 7 Dots Studio stickers and some handmade butterflies I created with the 'Don't forget to fly' cling stamps set and black embossing powder.
I also used a couple of chipboard pieces which I painted white with Heavy White Gesso.

Last thing to do was to doodle on the photo with a black pen and make some splashes with the Art Alchemy paints and White Gesso.

Here is my video with the whole process. I hope you will enjoy it and get inspired. :)


*Scroll down on this post to find a full products list


Thank you for visiting
have a lovely crafty day!
xxx
Athanasia

November 20, 2016

mini art journal |Your Voice is my fav Sound

Hi! I'm back with another colorful art journal page 
full of ColourArte products and also a VIDEO tutorial.


ColourArte products

H2Os
 Guatemalan Green
 Wild Blue Berry
 Tahitian Blue
 Yellow Rose
 Pink Azalea
 Luv U Pink

Silks
Black Ice

...

I hope you will enjoy my video and get inspired! 
Don't forget to leave me a comment, 
as well give me thumbs up and subscribe on my You Tube channel  :)


Thank you for visiting!
Have a lovely crafty day!
xxx
Athanasia

November 19, 2016

Snow Angels - Finnabair Art Recipe

Dear friends
The new Finnabair Art Recipe for Prima blog is here to inspire you.
Can you guess the art ingredients? :p

Snowflake Paste + Mica Powders + shimmery Glitter

 Art recip 12 2016

Snowflake Paste is perfect for creating dimension on your projects. 
It has a snowy white, subtly sparkly finish when it dries, and it makes the perfect base for adding Mica Powders and Glitter!

Snowflake paste is the perfect product for me to use in wintery and Christmas projects. In this project, I used it in three different ways: 

1. After covering the tag (recycled Mechanicals package) with Black Gesso, I used the Stars Stencil with the Snowflake Paste and the Silicon 1' Brush. When it was dry, I covered the stars with Black Gesso. I absolutely love the texture it adds to the project!

2. My next step was to glue all the embellishments with 3D Gel. I used the Snowflake Paste again to paint the large chipboard snowflake. Apart from the white shade, it added a beautiful sparkle to the chipboard piece.

3. When I was done painting the background with the Mica Powders (pale Silver, Rust, Frozen Lake and Tangerine), I used the Snowflake paste here and there with a paintbrush to add a real snow effect to my project. As the final touch, I added some glitter from the Ebony & Ivory set to the veil of the vintage girls with the Soft Matte Gel. I also attached a cute tassel I found in the Mechanicals Tassel set with a small Jump Ring.

For more inspiration you can visit the Prima blog post to see 
what the rest of the Finnabair Team created.


Thank you for visiting!
Have a lovely crafty day!

xxx
Athanasia

November 11, 2016

Hold on Time - art journal page

Hello dear friends!
This is my new journal page I created for Finnabair CT.

I was keeping the canvas sheet of my Denim Journal since I had the journal and I was waiting for the big idea to come - maybe something special or even better - something different that usual...
Even though it has been a really long time since I created something in vintage style, I wasn't going for this style. I had in mind something colorful, as always, but during the process I decided to keep it in natural shades.

I started with cutting and tearing the canvas sheet and when I was done with the destroying procedure  -lol- I used the Sculpture Medium to secure the torn pieces.
 Here is how it looked before I added all the mediums and embellishments.

 When it was dry I used two shades of homemade sprays with Mica Powders, Rust and Purple, and sprayed them all over the page.

Then I cut a sheet of watercolor paper in the same size as the canvas sheet as I needed to cover the whole space under the holes.
I used Modeling paste with the Lace stencil to create texture and stamps with black ink.

To embellish my journal page I used a vintage photo from the Ephemera - Vintage Collectibles, a Mechanical Flower, Copper and Bronze Micro Beads, wire, Art Stones and Mini art stones, Screw Brads, Melange Pebbles, wire and a couple of chipboard pieces. I glued everything with 3D Matte Gel.

To paint my journal I used two shades of Art Alchemy Opal Magic Paints: Rose Gold and Violet Gold.
I also used the Rust Pastes on the metal embellishments to make the project look even more vintage.

Finnaly I used the Black Gesso to paint the chipboard tittle and made some splashes here and there to add a little bit of contrast.

Here is my video with all the process. I hope you will enjoy it :)


*Scroll down on this post to find a full products list


Thank you for visiting
have a lovely crafty day!
xxx
Athanasia


November 6, 2016

mini art journal |page 1

Hello and wellcome back to my blog!
Today I'm sharing the first page of my new mini art journal 
I created with ColourArte products with a VIDEO tutorial.

Actually it's a mini sketch book which I decided to use as an art journal.
 I think it is very cute that it fits in my pocket, don't you think?
:)


Primary Elements
Honey Amber 
Blue Grass
Sunflower
Coral Berry
Rose Gold
Fuzzy Paech
Radiant Gels: Copper Pearls
Silks: Rustic Rose, Rusty Mauve
*Background stamp by Finnabair 
*Stickers by 7 Dots Studio
...

I hope you will enjoy my video and get inspired! 
Don't forget to leave me a comment, 
as well give me thumbs up and subscribe on my You Tube channel  :)


Details...


Thank you for visiting!
Have a lovely crafty day!
xxx
Athanasia

October 28, 2016

My ugly buttons

Hello dear friends!
I'm very excited and thankful to be invited back in Finnabair CT!
I'm looking forward to share my new projects and ideas with Finn's amazing products and I'm sure that it will be a fantastic journey for all of us!
Today I want to share an assemblage I created for Finn's blog with buttons and Art Alchemy Acrylic Paints.


I love collecting cute stuff like keys, coins, gems and alll kinds of
interesting little objects that come my way.
I've been collecting all these buttons for years, some of them are very old and I got them from my grandmother... So, I decided to create something with them.
Even I wasn' t sure how it would turn out, I knew from the beginning that I was going to cover them completely with paints, so I decided to chose all my ugly buttons and kept my favorite ones in the box.

Although it took me ages to find the right place for each one of them, I had so much fun playing - it was really like the 'TETRIS" game! You can watch the whole fun part in my video below :)


I used the 3D Gloss Gel to glue them down to a wooden base and covered everything with Heavy Black Gesso.

The most fun part of the whole process was to paint all these buttons with the Art Alchemy Acrylic Paints!

I really love how all these colors highlight the textures and different designs of the buttons.
I liked the result so much that I decided to add nothing more, even one single embellishment, but the tittle.

I used a chipboard word 'CREATE' and painted it with the White Crackle Texture Paste to add more texture and the Emerald Green Acrylic Paint, my favorite color shade.

To add even more texture to the assemblage I used again the White Crackle Texture Paste on several spots...
As my final touches I made splashes with all the colors shades I used before to color the buttons.
Here is my video with all the fun process. I hope you will enjoy it as much as I did :)


***for supplies list and links visit this post

Thank you for visiting!
Have a lovely crafty day!
xxx
Athanasia

October 16, 2016

Think Pink - art journal page for Breast Cancer Awareness

Dear friends
October is the month of Breast Cancer Awareness. 
Being healthy is the most significant value in our lives, as well being strong, having courage and being positive whenever difficulties enter our lives. 
Today's project is dedicated to this sensitive and so important issue.
You can watch my process in my VIDEO I made especially for you.  

ColourArte products I used in this project

Radiant Gels: Blue Pearls
H2Os: Raspberry Wine, Guatemalan Green, Pink Crocus
Vivids: Pink Azalea, True Silver
Clear Glaze Medium

I hope you will enjoy my video and get inspired! 
Don't forget to leave me a comment, 
as well give me thumbs up and subscribe on my You Tube channel  :)


details...


***
For more inspiration you can see these two projects I created last year for this important cause.

love yourself - art journal page

Spread the hope - Layout for Breast Cancer Awareness

(with video tutorial)


***

Thank you for visiting,
I wish you all a happy life full of health!
Stay positive, think pink <3

xxx
Athanasia