Showing posts with label balsa wood. Show all posts

June 19, 2016

Tiny roof tiles *video

Hello :)
My new tutorial for ColourArte is here:


I altered these cute tiny roof tiles in order to give them as a gift appreciation to my daughter's teachers. They already have them and both loved them :)

The ColourArte products I used to paint them are:

Primary Elements

All Purpose Clear Glaze Medium 4oz Bottle


I mixed the Primary Elements with the Glaze Medium and made custom waterproof paints.
You can see all the process in my video, I hope you will enjoy it!
Don't forget to leave me a comment, as well give me thumbs up on my You Tube channel!


Thank you for visiting!
Have a lovely crafty day!

xxx
Athanasia


October 28, 2015

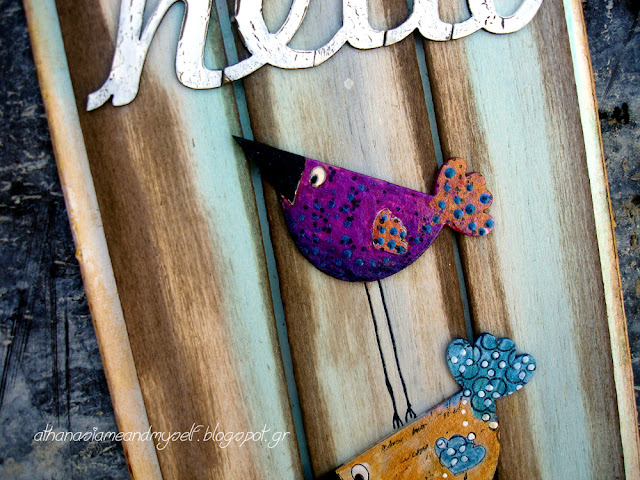
Hello birds!

Hello dear friends!
Today I'm sharing a fun and cute canvas for 2Crafty Chipboard blog, 
with  lots of colors and ...birds :)


I had this beautiful set of birds for some time and just waited for the great idea to come and use them.
The set contains three sizes of birds (two of each size), so I came up with a bird pyramid.


I decided to use 4 of the 6 birds, not only for the reason to keep my pyramid not too high, but also to use the particular white cardboard I had. I measured a balsa wood at the same size of the cardboard, cut it in 3 and glued it down.  I painted both of them with gesso, blue silks and brown distress stain. 
Ι didn't use any stamps or stencils, as I wanted to keep the background quite and simple and focus on the birds.

To alter the birds I used silks, a little bit of gesso, stamps and a black permanent pen...

First I painted them with just a small amount of gesso very carefully, because I didn't want to cover the beautiful engraved pattern of them. Τhe white gesso helps the colors to show bright and right. 
After the gesso dried, I painted them with the silks.  Then I stamped on them here and there and paint some details with a pretty thin paintbrush again with silks. Last thing to do was to draw the legs with the black permanent pen.

For the tittle I used the Script Font L/C alphas. I really like this script because of the calligraphy type - the letters abutting each other so nicely like they are handwritten.
I altered them with white crackle paint and I love how they turned out!

2Crafty Chipboard products used on this project:

Beaky Birds 

Script Font L/C 

BeakyBirds (unit of 3)  Script Font L/C (units of 3)


Thank you for visiting!
Have a lovely crafty day!


September 20, 2015

Hello little fairy!

Hello everyone!
Today I'm sharing my project for ColourArte.
It's a small canvas in a shadow frame for my daughter's bedroom.


ColourArte Products for this project:
Other Supplies:
  • Balsa wood
  • Stamp
  • Gesso
  • 2 Crafty Chipboard
  • flowers
  • Prima resin window
  • Wooden label
  • Gold thread
  • Sequins
  • Stapler and scissors
  • Shadow Frame
So, lets get started!

1. I cut with scissors the balsa wood in house shape and painted it with the blue shades Twinkling H2Os Watercolors and with the Warm Grey color the edges. I also made with my pencil a couple of carves to make the wood pore real.


 2. I stamped the dress of the fairy, painted it with the Twinkling H2Os Watercolors and cut it around with scissors. Then I took one of my daughter's photo, cut around the part of the head and glued it on the fairy's painted body.

3. As I wanted my fairy to hold something like the original on the stamp, I decided to make some hearts with rice paper. I painted them with the Twinkling H2Os Watercolors African JadePearl Gold and Vanilla Bean and used the stapler to give it more interest.

4. In order to alter the chipboard pieces I used all the Twinkling H2Os Watercolor shades plus the Radiant Rain spray Sunburst. I chose this spray because it has a really bright yellow and I really love it!

5. I glued all the embellishments on the balsa house and then I spread some of the three Primary Elements colors here and there. I really love how they blend together and I always use them as a final touch on my projects.

6. I glued the fairy with the hearts on the composition and the hole project on a white cardstock which I had gessoed previously. I placed in a IKEA shadow frame and made some doodling and splashes around the composition.

Here are some closeups...


...and the finished project. It's already hanging in my daughter's bedroom :)

>>>
With this project I'm entering the Paper Dvizhnik challenge. I really loved the color pallet of this beautiful moodboard!

>>>

***Here is my other project with a similar balsa house


Have a lovely crafty day!

Finally I understand...

Hello everyone!
Today we have a new Creative Gym at Mixed Media Place:

Proverbs and Sayings

You may create any type of art inspired by proverb or saying. 
From cards to layouts, altered art and journal pages... be free and create some art!

Here is my project


'Finally I understand little things are the most important in life'. 
I chose this simple but very important for me quote, because it represents what I'm trying to do in my life this period. 


I wanted to place the photo with the quote on a house. Don't ask me why, I just had this vision. Maybe the house is the symbol of the enduring values of our life. So, I took a piece of balsa wood and cut a house shape with my scissors. I painted the edges with the Gathered Twig Distress Stain and the rest of it with the Celedon Silk.


 To alter the chipboard pieces I used the Honey Amber silk and Black Heavy gesso. I glued them on the painted house, then I glued the photo with a folded old paper and last the metal embellishments.


Finally I glued the hole composition on some stamped pages from an old book and all these on a cardboard in the same size. The last thing to do was to wrap a twine all around the project.

***You can find all products at Mixed Media Place store

So, I'm looking forward to see your projects for our challenge.
If you want more inspiration please visit the MMP blog to see what created the rest of the ladies.

 >>>

With this project I'm entering the September challenge at Colorful World with this beautiful moodboard. I got inspired by the wood and the colors.


>>>

Thank you for visiting!
Have a lovely crafty day!


June 9, 2014

Wreath: new look


Γεια σας!
Μήπως σας θυμίζει κάτι αυτό το στεφάνι;
Αν έχετε δει αυτό το  post  τότε θα θυμάστε ότι είχα φτιάξει ένα στεφάνι με υφασμάτινα στοιχεία (που τα είχα ράψει εγώ). Λοιπόν, αποφάσισα για μία ακόμη φορά να το αλλάξω :)
Αυτό είναι το πριν:

Hello!
Do you remember a wreath I made a few months ago?
Well, I decided to alter it and give it a new look (this is my post with the old wreath). This is how it looked like before:


Όπως βλέπετε είναι αρκετά διαφορετικό, καθώς αφαίρεσα τα περισσότερα στοιχεία και κράτησα την κάτω σειρά μόνο. Τα σπιτάκια τα έφτιαξα με μπάλσα (ξύλο για χειροτεχνίες) και τα διακόσμησα με χαρτί Bo Bunny,  στάμπες, λίγο ύφασμα και κουμπιά. Για καμινάδα τύλιξα σύρμα σε μια οδοντογλυφίδα και στερέωσα, με το ίδιο σύρμα, τα πουλάκια Studio Calico.

The new wreath is quite different, although I kept all the elements untouched at the bottom line. I made three houses with balsa wood and decorated them with Bo Bunny paper, some stamps, fabric remnants and buttons.  Then I got some thin (for jewelry) wire and twisted it around a toothpick to make a spiral effect for the chimneys. At the end I attached the Studio Calico birds to the wire and that's it! 


Νομίζω ότι το νέο look είναι πολύ πιο ωραίο από το προηγούμενο!
I hope you like the new look!