Showing posts with label houses. Show all posts

June 19, 2016

Tiny roof tiles *video

Hello :)
My new tutorial for ColourArte is here:


I altered these cute tiny roof tiles in order to give them as a gift appreciation to my daughter's teachers. They already have them and both loved them :)

The ColourArte products I used to paint them are:

Primary Elements

All Purpose Clear Glaze Medium 4oz Bottle


I mixed the Primary Elements with the Glaze Medium and made custom waterproof paints.
You can see all the process in my video, I hope you will enjoy it!
Don't forget to leave me a comment, as well give me thumbs up on my You Tube channel!


Thank you for visiting!
Have a lovely crafty day!

xxx
Athanasia


May 15, 2016

wooden houses

  Happy Sunday dear friends!
Today I'm sharing a fun project I created to decorate my leaving room.
I had so much fun 'building' these cute houses and painting them with ColourArte pigments.

Here are the supplies I used to create them:

ColourArte products


Other products:
  • White Heavy Gesso
  • Black Gesso
  • paintbrush
  • pyrographer
  • sandpaper
  • wood blocks (I used the legs from an old cheap ikea table)
  • jigsaw

The whole idea came when I saw the wooden legs of an old cheap ikea table standing at the corner of our warehouse. They had the perfect size to create some houses. I knew that we weren't going to use this table never again, so with no second thought I cut them in pieces with the jigsaw. I didn't do any measuring, just started cutting in different sizes.
Next thing to do was to use the sand paper to soften the edges and make them look old. 
After that, I used the pyrographer to create the doors and windows. That took a lot of time but it really worth it! If you don't have a pyrographer you can simply use paints to draw doors and windows. 
Then I started painting the houses.

I made my own Glaze paints by mixing in the Clear Glaze Medium my favorite arte-pigment colors. 

Again, no measuring at all, just keep in mind that the more color you add, the more opaque look you get or add more Glaze for Extra Transparency. Just play with the paints and have fun!


I didn't use any container to blend the paints, I just added some Clear Glaze on the corner of the house and spread the pigment in there. It's pretty easy to apply it, the paint is so smooth, I just love it! I kept adding some more pigment here and there and just blending with the paintbrush and when I was happy with the result I let it dry naturally and kept going with the next house and so on...

I used on three of the five houses blue/green shades of Primary Elements pigments and on one house the Fuzzy Peach shade. I also painted two houses with White Heavy Gesso and all the roofs with Black Gesso.

Last and very important step for me was to sand all the edges of the houses with sandpaper, to create an aged look. I also used it on all the sides of the houses to remove most of the gloss of the paints.

I really love the result, they are already standing on my shelf :)
***you can find all ColourArte products here 

Thank you for visiting,
have a lovely crafty day!

xxx
Athanasia

June 9, 2014

Wreath: new look


Γεια σας!
Μήπως σας θυμίζει κάτι αυτό το στεφάνι;
Αν έχετε δει αυτό το  post  τότε θα θυμάστε ότι είχα φτιάξει ένα στεφάνι με υφασμάτινα στοιχεία (που τα είχα ράψει εγώ). Λοιπόν, αποφάσισα για μία ακόμη φορά να το αλλάξω :)
Αυτό είναι το πριν:

Hello!
Do you remember a wreath I made a few months ago?
Well, I decided to alter it and give it a new look (this is my post with the old wreath). This is how it looked like before:


Όπως βλέπετε είναι αρκετά διαφορετικό, καθώς αφαίρεσα τα περισσότερα στοιχεία και κράτησα την κάτω σειρά μόνο. Τα σπιτάκια τα έφτιαξα με μπάλσα (ξύλο για χειροτεχνίες) και τα διακόσμησα με χαρτί Bo Bunny,  στάμπες, λίγο ύφασμα και κουμπιά. Για καμινάδα τύλιξα σύρμα σε μια οδοντογλυφίδα και στερέωσα, με το ίδιο σύρμα, τα πουλάκια Studio Calico.

The new wreath is quite different, although I kept all the elements untouched at the bottom line. I made three houses with balsa wood and decorated them with Bo Bunny paper, some stamps, fabric remnants and buttons.  Then I got some thin (for jewelry) wire and twisted it around a toothpick to make a spiral effect for the chimneys. At the end I attached the Studio Calico birds to the wire and that's it! 


Νομίζω ότι το νέο look είναι πολύ πιο ωραίο από το προηγούμενο!
I hope you like the new look! 


May 26, 2014

clay houses (orange)


Hello! I made two more clay houses in orange shades. Actually they are a gift for a special friend and tomorrow they are going to travel far away...:)
I really enjoy making all these clay cuties, I just can't have enough! 


May 17, 2014

clay houses (pink)


Everyone who knows me well, knows that I looooove houses: little ones, big ones, wooden, clay, paper, fabric, felted...

So, a few days ago, I made these cuties with ear-dry clay, shaped them with hands (no tools at all) and let them dry. I painted them with white acrylic paint and then randomly inked the edges with black ink and stamped with a Prima floral corner stamp. Then I got some thin (for jewelry) wire and wrapped it around the houses (also I made some spirals using a toothpick) to secure the flowers and metal elements and also to make the spiral 'chimneys'.

I love how they turned out and I've already found for them a place on my fireplace :)


January 12, 2014

Wreath ~ στεφάνι


Καλή χρονιά σε όλους!
Εύχομαι το νέο έτος να είναι γεμάτο υγεία, ευτυχία και δημιουργία για όλους μας!
Έτσι λοιπόν ξεκινώ και εγώ τη χρονιά μου με δημιουργικό πνεύμα και όρεξη για αλλαγές: επειδή περνάω πολλές ώρες στο σπίτι αυτό τον καιρό με τον μπέμπη, σε μια προσπάθεια αλλαγής παραστάσεων και αποφυγής οξείας βαρεμάρας, αλλάζω συνέχεια την διακόσμηση στο σπίτι - αν μπορούσα να μετακινήσω και τα έπιπλα θα το έκανα, αλλά δυστηχώς ο χώρος δεν το επιτρέπει. 
Το στεφάνι αυτό το έφτιαξα για το τζάκι, το οποίο έχει πολύ στενή επιφάνεια για διακοσμητικά 
(μόνο 10εκ) και πολύ με δυσκολεύει γενικότερα να το γεμίσω, οπότε μου ήρθε η ιδέα για το στεφάνι.
Happy new year everybody!
I hope the new year will be full of health , happiness and creativity for all of us !
So, this year has started full of creativity and appetite for changes : Now that I spend many hours at home taking care of my baby boy , in an effort to change the daily routine and avoid acute boredom , I constantly change the house decoration - if I could move and furniture I would , but unfortunately the house space and layout does not allow me to.
This wreath is for the fireplace , which has a very narrow horizontal surface for decorative stuff
(only 10cm ) and generally is quite hard to fill , so I got the idea of a wreath .


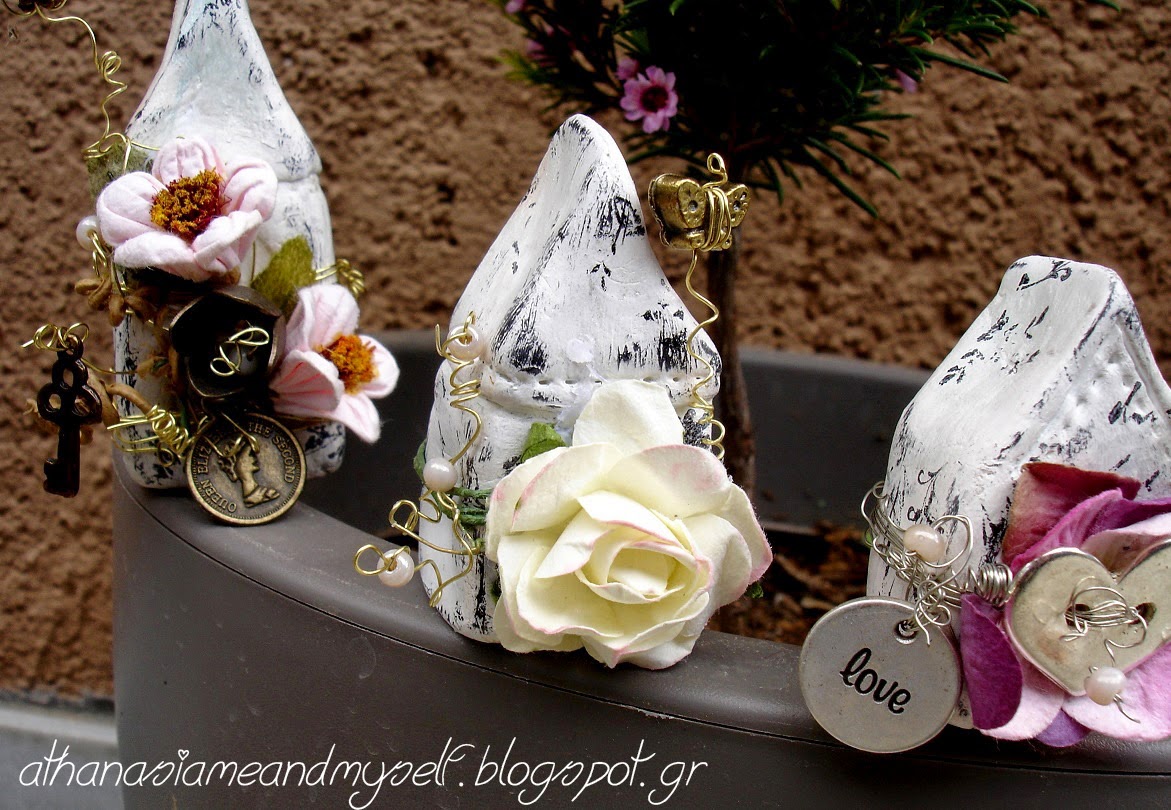
Τα υφασμάτινα στοιχεία τα έφτιαξα εγώ (πουλί, σπιτάκι, καρδιές), τα κόκκινα πλεκτά που βλέπετε στο πουλάκι, στο σπίτι και τα λουλούδια τα έπλεξα με την πλεκτομηχανή της κόρης μου (που της έφερε ο Αη Βασίλης - χιχι), τις κουβαρίστρες, το κλειδί και τις καρδιές γιρλάντα τις αγόρασα από ένα τοπικό μαγαζάκι εδώ και καιρό και το δεντράκι είναι από πηλό χαρτοπολτού. Επίσης αν προσέξατε έχω κάνει και μερικές στάμπες - η πρώτη σκραμπουκική απόπειρα εδώ και σχεδόν ένα χρόνο. Ευτυχώς τα μελάνια μου δεν στέγνωσαν, ουφ!
Μέσα στην εβδομάδα θα τακτοποιήσω/ξαραχνιάσω και το γραφείο μου, οπότε ελπίζω το επόμενο post να αφορά scrapbooking - κάτι έχω στο μυαλό μου :)
Αυτά για σήμερα, φιλιά!
The fabric elements are made by me ( bird, house , hearts ), the red knitted you see in birdie, the little house and the knitted flowers were made by a knitting machine my daughter got for Christmas , the spools, the key and hearts garland were bought from a local shop, the tree is made of clay pulp. Also if you notice I've done some stamps - the first scrapbooking attempt since a year ago. Luckily enough, my inks did not dry!
Within the week I will rearrange my working bench, so hopefully the next post will be about scrapbooking - I've already have something in my mind :)
That's all for today!


January 6, 2013

felt houses - τσόχινα σπιτάκια


Η τσόχα είναι ένα από τα αγαπημένα μου υλικά και είχα πολύ καιρό να ασχοληθώ μαζί της...
Πριν τις γιορτές έφτιαξα αυτά τα μικρά τσόχινα σπιτάκια για να τα κάνουμε δώρο στις δύο δασκάλες της κόρης μου... Οι φωτογραφίες είναι λίγο βιαστηκές γιατί σκέφτηκα να τα φωτογραφίσω λίγο πριν φύγουμε για το σχολείο και δεν είχα πολύ χρόνο. Όπως φαίνεται, είναι όλα ραμμένα στο χέρι και μάλιστα τα κομμάτια των τοίχων και της σκεπής τα έκοψα χωρίς να κάνω πατρόν, απλά με το μάτι ;) Μέσα τα γέμισα με κλωστές και βελόνες, ένα ψαλιδάκι, κουμπιά και καρφίτσες. Η σκεπή λειτουργεί σαν 'καπάκι', της έχω κάνει κουμπότρυπα για να κουμπώνει στον μπροστινό τοίχο με ένα κουμπί και μπορείς πάνω της να στερεώνεις τις καρφίτσες. Νομίζω ότι είναι τέλεια σαν 'κουτάκια' για σετ ραπτικής και περιττό να σας πω πόσο ξετρελλάθηκαν οι δασκάλες μας!
It has been a while since I made crafts with felt, one of my favorite material...
So, just before Christmas I made these little felt houses as a gift for my daughter's two teachers... I took the photos in a rush,  just before we left for school, so I didn' t had much time to take more appropriate ones. I filled the houses with threads and needles, a scissors, buttons and pins. The roof works as a 'cap' and secures on the house with a button. I think they are perfect as 'boxes' for sewing kit as well as pincushions and needless to say how much our teachers liked them!


Το μεγάλο σπιτάκι της παρακάτω φωτογραφίας το είχα φτιάξει πριν δύο χρόνια. Επειδή είναι πολύ μεγάλο με πολλές λεπτομέρειες (πολλές από αυτές τις έχω κάνει με την ειδική βελόνα για felting και ΟΛΑ τα στοιχεία από την πόρτα μέχρι τα λουλουδάκια τα έχω κόψει και ράψει στο χέρι), είχε πάρα πολύ δουλειά και μου πήρε πολλά απογεύματα να το τελειώσω. Είναι όλο ραμμένο στο χέρι, εκτός από το φερμουάρ που μου το 'πέρασε' η μαμά μου με τη γαζωτική μηχανή της. Το σπιτάκι-νεσεσέρ είναι μία από τις πιο αγαπημένες μου δημιουργίες και το χρησιμοποιώ σαν αποθηκευτηκό χώρο για τα νήματα μου.
 I made the big felted house in the photo below two years ago. For the reason that it is very big with many details, I had to work hard and use a lot of techniques (hand sewing, needle felting, etc)  and it took me several evenings to finish it. Finally my mom sewed the zipper with her sewing machine and ...voila! A cute handmade neceser!  It is one of my favorite creations and I use it as storage for my yarn.